
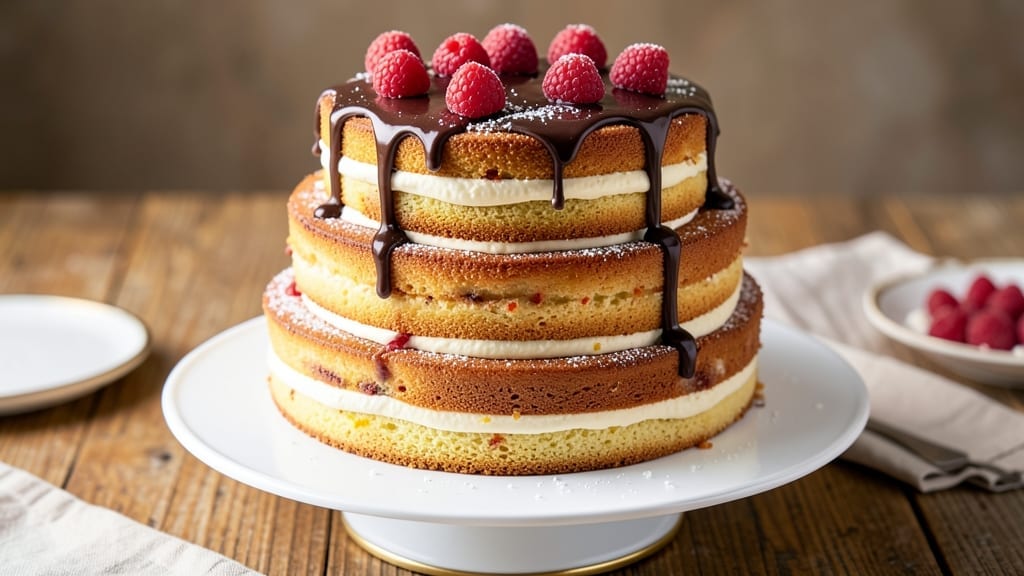
This 7-Up layer cake recipe delivers the nostalgic citrusy zing of 7-Up soda in every moist, fluffy layer—perfect for birthdays, showers, or just because. The secret lies in infusing the cake batter and filling with real 7-Up, creating that signature lemon-lime flavor without overpowering the vanilla swirls.
I’ve baked this cake countless times, and the balance of tangy citrus and sweet vanilla always gets rave reviews.
The recipe starts with a tender vanilla cake base, baked in layers for easy assembly. Between each layer, a luscious 7-Up-infused cream cheese frosting adds both moisture and that unmistakable citrus punch.
The frosting is piped in swirls for a classic look, but you can also go for a smooth finish if you prefer. What makes this cake truly special is how the 7-Up flavor shines through without tasting artificial—just like the soda itself.
By the time you’re done, you’ll have a cake that’s perfectly moist, not too sweet, and bursting with that nostalgic 7-Up flavor in every bite. The citrus notes brighten the vanilla, creating a harmonious balance that keeps people coming back for seconds.
This recipe is beginner-friendly, with clear steps and measurements to ensure success every time.
Serve it with a scoop of vanilla ice cream or fresh berries to complement the citrusy flavors. The cake keeps well at room temperature for 2-3 days, making it perfect for celebrations ahead. Let’s get baking!
Ingredients for 7 up layer cake
Gather these nostalgic ingredients for a citrusy, fluffy 7-Up cake with vanilla swirls.
| Ingredient | Amount | Notes |
|---|---|---|
| All-Purpose Flour 🌾 | 3 cups | Sifted for fluffy layers |
| Granulated Sugar 🍚 | 2 ¼ cups | White sugar preferred |
| 7-Up Soda 🥤 | 1 ½ cups | Chilled for infusion |
| Unsalted Butter 🧈 | 1 cup | Room temperature, not melted |
| Large Eggs 🥚 | 4 whole | Room temperature for best results |
| Vanilla Extract 🌿 | 2 tsp | Pure extract, not imitation |
| Baking Powder 🧂 | 2 tsp | Double-acting preferred |
| Salt 🧂 | ½ tsp | Fine sea salt |
| Cream Cheese 🧀 | 16 oz | Full-fat, room temperature |
| Powdered Sugar 🍚 | 4 cups | Sifted for smooth frosting |
| Heavy Whipping Cream 🥛 | 1 cup | Cold for whipping |
| Vanilla Ice Cream 🍦 | 2 cups | For serving, optional |
| Fresh Berries 🍓 | 2 cups | Strawberries or blueberries |
The 7-Up is the star here—grab a 2-liter bottle from the grocery store’s soda aisle, not the diet version. The cream cheese matters too: Philadelphia brand is my go-to, but any full-fat works. For the frosting, powdered sugar should be sifted to avoid lumps, and the butter needs to be room temp so it whips smoothly. If you’re using store-bought vanilla ice cream, Blue Bell or Breyers are solid choices—they won’t overpower the cake’s flavor. Fresh berries add a nice pop of color, but they’re totally optional if you’re serving this right away.
No 7-Up? Sprite or lemon-lime soda works in a pinch, though it won’t taste exactly the same. Running short on powdered sugar? Granulated sugar in a food processor does the trick. The frosting can be made ahead and stored in the fridge for up to 2 days, just re-whip before using. For a stronger citrus kick, add 1 tbsp lemon juice to the cake batter. And if you’re feeling fancy, swap the vanilla ice cream for citrus-scented sorbet to match the 7-Up flavor. The cake layers can be baked a day ahead—they freeze beautifully too.
This cake keeps for 3-4 days at room temperature, wrapped tightly in plastic. For longer storage, freeze the fully assembled cake (without frosting) for up to 3 months
Why You’ll Love This Recipe
- No Pantry Stress: I’ll never stress over missing ingredients again—just flour, sugar, butter, eggs, and a can of 7-Up. That’s it. The soda’s tangy magic replaces buttermilk or vinegar, so no extra shopping trips or last-minute substitutions.
- Citrus-Zing Twist: That 7-Up isn’t just a mixer—it’s the star. The lemon-lime fizz cuts through the richness of the buttercream, giving each bite this bright, nostalgic pop. Honestly? It’s the kind of flavor that makes you want to eat the bowl and the cake.
- Birthday Party Ready: Slice it for a crowd, stack it for a single celebration, or even freeze layers for later. The frosting stays fluffy, the cake stays moist, and no one will guess it’s made with pantry basics. (Yes, even on a Tuesday night.)
- Budget-Friendly Luxury: This cake costs me pennies but feels like a bakery showstopper. The buttercream’s velvety, the layers are light, and I’ve never had leftovers last more than a day. That’s a win for my wallet and my sweet tooth.
Step-by-step instructions for 7 Up layer cake
Here’s how to create a light, citrusy cake with a creamy vanilla swirl—simple steps for perfect layers every time.
Mix the Cake Batter with 7-Up Soda
Preheat your oven to 350°F and grease three 8-inch round cake pans, lining the bottoms with parchment paper. In a large mixing bowl, cream together the 1 cup unsalted butter and 2.25 cups granulated sugar on medium speed until light and fluffy, about 3-4 minutes. Add the 4 whole large eggs, one at a time, mixing well after each addition.
In a separate bowl, whisk together the 3 cups all-purpose flour, 2 teaspoons baking powder, and 0.5 teaspoon salt. Gradually add the dry ingredients to the butter mixture, alternating with the 1.5 cups chilled 7-Up soda, beginning and ending with the flour. Mix on low speed just until combined—don’t overmix. Fold in the 2 teaspoons vanilla extract until evenly distributed.
Bake the Layers to Golden Perfection
Divide the batter evenly among the prepared cake pans, filling them about two-thirds full. Bake for 25-30 minutes or until a toothpick inserted into the center comes out clean. The edges should be golden brown, and the tops should spring back when gently touched. Let the cakes cool in the pans for 10 minutes, then transfer to a wire rack to cool completely.
Here’s the thing—if the tops look slightly domed, don’t worry. The layers will flatten as they cool, giving you even, smooth surfaces for frosting. If the centers seem underdone, return them to the oven for 2-3 minutes to finish cooking.
Prepare the Cream Cheese Frosting
In a large bowl, beat the 16 ounces cream cheese and 1 cup unsalted butter together on medium speed until smooth and creamy, about 3-4 minutes. Gradually add the 4 cups powdered sugar, mixing on low speed until fully incorporated. Increase the speed to medium and beat in the 1 cup heavy whipping cream until light and fluffy, about 2 minutes. Fold in the 2 teaspoons vanilla extract until fully combined.
This frosting should be thick but spreadable. If it’s too stiff, add 1-2 tablespoons milk to loosen it. If it’s too thin, chill it for 15 minutes and re-whip. The texture should be smooth and pipeable—this is key for clean, professional-looking layers.
Assemble the Cake with Vanilla Swirls
Once the cake layers are completely cool, level the tops if needed using a serrated knife. Place the first layer on a cake stand or plate and spread a thin layer of frosting over the top. Add ½ cup vanilla ice cream, softened slightly, and gently spread it into a thin layer. Top with the second cake layer and repeat the process. Finish with the third layer.
Cover the entire cake with a thin crumb coat of frosting, then chill in the refrigerator for 15 minutes. This step prevents crumbs from getting into your final frosting layer. Once chilled, apply the remaining frosting, smoothing it evenly with a spatula. For extra flair, pipe swirls or rosettes on the sides using a piping bag fitted with a star tip.
Garnish and Serve
Top the cake with the 2 cups fresh berries, arranging them in a circular pattern or scattering them over the top. Let the cake sit at room temperature for 30 minutes before slicing to allow the frosting to set slightly. Serve immediately for the best texture—this cake is at its peak when fresh!
Each slice should reveal a citrusy, tender crumb with pockets of creamy vanilla ice cream swirled throughout. The berries add a bright, juicy contrast that cuts through the richness of the frosting. Enjoy with a cold glass of 7-Up for the full experience!
Pro Tips For Making 7 Up Layer Cake
- Chill the Butter First: I learned this the hard way—using warm butter straight from the fridge makes the batter too thin, and your cake layers end up dense instead of light. Take that butter out 30 minutes before mixing so it’s soft but not greasy. Trust me, your layers will thank you with that perfect crumb.
- Measure Soda Precisely: That 7-Up isn’t just flavor—it’s the leavening agent, and pouring it straight from the bottle means inconsistency. Use a measuring cup and pour it slowly into the dry ingredients, letting it fully saturate the flour before mixing. Rushing this step? Your cake might sink like a rock.
- Don’t Overmix the Batter: I used to beat this batter until it looked like glue, thinking more mixing = better cake. Wrong. Once the flour and wet ingredients come together, mix just until combined—about 20 seconds. Overdo it, and you’ll end up with tough, chewy layers instead of that classic tender crumb.
- Rotate Pans Mid-Bake: Your oven’s hot spots are real, and if you don’t rotate the cake pans halfway through (around 15–18 minutes), one side will dry out while the other stays underdone. Flip them front-to-back for even baking—no one wants a cake with a sad, gummy center.
Troubleshooting great 7 up layer cake
Cake Layers Too Dense
Overmixing the batter is the #1 culprit for dense layers. Mix just until combined—stop when the flour disappears. Also, make sure your 7-Up soda is chilled before adding it to the batter.
Cold soda helps create air pockets for a lighter texture. If your layers still feel heavy, try reducing the flour by 1 tablespoon next time. 💡
Frosting Too Thin
If your cream cheese frosting is too runny, it’s usually because the butter wasn’t cold enough or the powdered sugar was clumpy. Start with cold cream cheese and butter straight from the fridge.
Sift the powdered sugar first, and if needed, add 1 tablespoon cornstarch to absorb excess moisture. Chill the frosting for 15 minutes before piping to thicken it up. ✨
7-Up Flavor Too Strong
The citrusy kick of 7-Up can overpower delicate flavors if not balanced. To mellow it out, add 1 extra teaspoon of vanilla extract to the batter. You can also reduce the soda by ¼ cup and replace it with ¼ cup milk or water.
For a sweeter cake, increase the sugar by 2 tablespoons—this helps balance the tang. 🍋
Crumbs in the Frosting
Crumbly cake layers are usually caused by frosting too soon. Always let layers cool completely before assembling. For extra protection, brush each layer with simple syrup (equal parts sugar and water) before adding frosting.
This creates a moisture barrier. If crumbs still appear, add a crumb coat (thin layer of frosting) and chill for 15 minutes before the final layer. 🧈
Cake Sticking to Pans
Grease your pans thoroughly with butter or baking spray, then line the bottoms with parchment paper. If the cake still sticks, try using 8-inch pans with removable bottoms for easier release.
Avoid overfilling the pans—fill them only ⅔ full to prevent overflow. If needed, dust the pans with flour or cornstarch before adding batter. 🔥
Frosting Won’t Hold Shape
If your frosting collapses or slides off, it’s likely too warm or not whipped enough. Make sure all ingredients are cold before mixing, and whip on high speed until stiff peaks form.
For extra stability, add 1 teaspoon unflavored gelatin (dissolved in 1 tablespoon hot water) to the frosting. Chill the cake in the fridge for 10 minutes before adding final decorations to help the frosting set. 💫
Nutrition facts
Frequently asked questions
Why does this cake use 7-Up instead of lemon or lime juice?
The 7-Up adds that nostalgic citrus fizz without the harshness of fresh lemon or lime juice. The soda’s natural sweetness balances the acidity, creating a smoother flavor profile that pairs perfectly with vanilla. Plus, the bubbles in the soda help keep the cake extra moist—something you won’t get from juice alone.
Can I make this cake in a different flavor?
Swap the vanilla ice cream for chocolate pudding or strawberry jam between layers for a fruity twist. For a spiced version, add 1 teaspoon cinnamon to the batter. The 7-Up flavor works best with sweet, creamy fillings—just avoid overly tart or salty pairings.
How do I store leftovers without drying out the cake?
Wrap each layer individually in plastic wrap, then store them in an airtight container at room temperature for 2 days. For longer storage, freeze the fully assembled cake (without frosting) for up to 3 months. Thaw overnight in the fridge and re-whip the frosting if needed.
What if I don’t have 7-Up? Can I substitute it?
Use Sprite or lemon-lime soda as a substitute, but expect a slightly different taste. For a non-soda option, mix 1 cup lemon juice + 1 cup water + 2 tablespoons sugar to mimic the citrus flavor. The cake will still be delicious, though the texture may be slightly denser without the soda’s bubbles.
Is this cake gluten-free?
Not as written—this recipe uses all-purpose flour. For a gluten-free version, substitute the flour with a 1:1 gluten-free baking blend and add ½ teaspoon xanthan gum to the dry ingredients. You may also need to reduce the 7-Up by ¼ cup since gluten-free batters absorb more liquid.

- 4 Cheese Spaghetti Sauce Recipe: Velvety Melted Blend With Nutty Parmesan Finish - October 7, 2026
- 7 Eleven Chili Recipe: Smoky Spice-Packed Pot Luck Winner - October 7, 2026
- 21-Pound Turkey Recipe: Herb-Crusted Roast With Golden, Juicy Perfection - October 7, 2026