
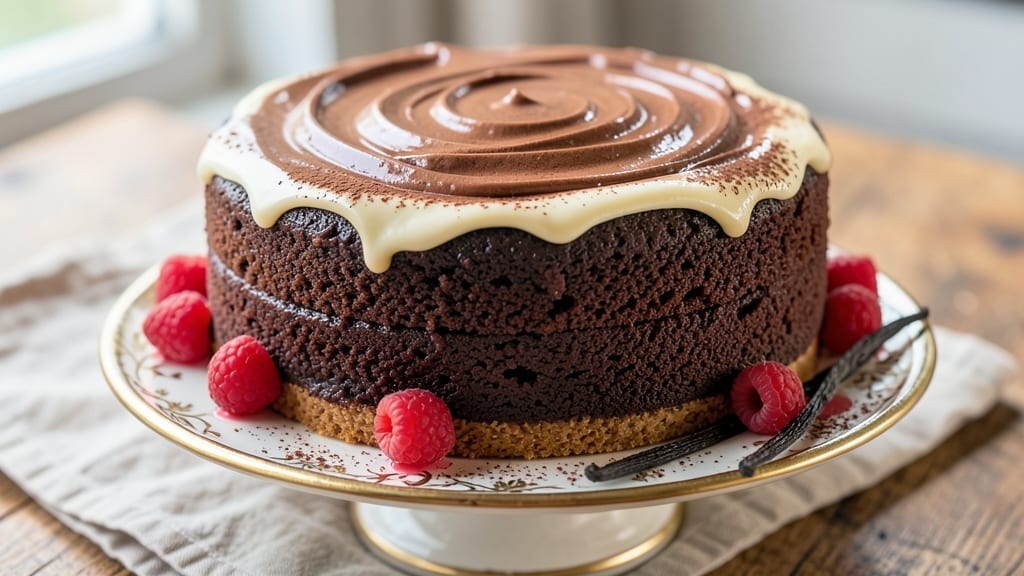
This 6-inch moist chocolate cake recipe delivers the perfect balance of fudgy richness and tender crumb—no dry crumbs here. The secret lies in precise mixing techniques and a vanilla bean swirl that transforms a simple cake into something extraordinary.
I’ve baked this recipe dozens of times, and it never fails to impress with its moist, velvety texture and deep chocolate flavor that lingers with every bite.
The foundation begins with properly creaming butter and sugar until light and fluffy, which incorporates air for that signature tenderness. High-quality cocoa powder and melted chocolate create the fudgy core, while vanilla bean paste adds depth and a subtle floral note that elevates the chocolate.
This isn’t just any chocolate cake—it’s a cake that stays moist for days, making it ideal for special occasions or when you want to bake ahead.
What sets this recipe apart is the attention to detail in the baking process. A warm water bath ensures even baking, while the right temperature and timing prevent cracking. The cake rests before slicing, allowing the layers to set properly and the flavors to meld.
By the time you serve it, you’ll have a moist, decadent chocolate cake with a swirl of vanilla that makes every slice feel like a treat.
Perfect for birthdays, anniversaries, or simply satisfying a chocolate craving, this recipe yields a single 6-inch cake that serves 6-8. The instructions are designed to be foolproof, ensuring you achieve the same results as a professional baker.
Let’s get started on creating this crowd-pleasing dessert that’s as beautiful as it is delicious.
Ingredients for 6 inch moist chocolate cake
Twelve ingredients, one extraordinary 6-inch cake with a fudgy core and vanilla swirls.
| Ingredient | Amount | Notes |
|---|---|---|
| Unsalted Butter 🧈 | 1 cup | Room temperature, softened |
| Granulated White Sugar 🍚 | 1 ½ cups | Lightly packed for accuracy |
| Dutch Process Cocoa Powder 🍫 | ¾ cup | High-quality, unsweetened |
| Vanilla Bean Paste 🌿 | 2 tbsp | Real vanilla for depth |
| Large Eggs 🥚 | 2 whole | Room temperature |
| All-Purpose Flour 🌾 | 1 ½ cups | Sifted for lightness |
| Baking Soda 🧂 | ½ tsp | Pure, not baking powder |
| Salt 🧂 | ½ tsp | Fine sea salt |
| Whole Milk 🥛 | ¾ cup | Room temperature |
| Dark Chocolate Chips 🍫 | ¾ cup | 70% cocoa, semi-sweet |
| Vanilla Extract 🌿 | 1 tsp | Pure vanilla extract |
| Hot Water 💧 | ¼ cup | For water bath |
The butter and sugar are your foundation—use European-style butter like Plugrá or President for richer flavor. Cocoa powder makes all the difference: Valrhona or Ghirardelli are worth the investment for that velvety texture. I always grab vanilla bean paste from specialty stores (like Williams Sonoma) because it delivers that authentic vanilla depth. The eggs should be at room temperature—cold eggs can cause cracks. For the flour, King Arthur or Bob’s Red Mill brands yield the best results, and sifting ensures no lumps in your batter. Chocolate chips? Enjoy Life brand if you need gluten-free, but Ghirardelli or Guittard are my go-tos for classic flavor.
No vanilla bean paste? Use 1 tablespoon pure vanilla extract plus 1 teaspoon vanilla sugar—it won’t be identical, but it works in a pinch. Substituting cocoa powder? Natural cocoa works 1:1, but Dutch-process needs a pinch of baking soda added to the batter. Running low on butter? Coconut oil at room temperature mimics the texture, though flavor differs. For the milk, any kind works, but whole milk gives the richest result. The chocolate chips can be chopped bars if needed—just make sure they’re at least 60% cocoa for that deep chocolate flavor. And if you’re baking ahead, the cake actually improves after 24 hours** in the fridge—trust me on this.
Store the cake in an airtight container at room temperature for up to 3 days, or refrigerate for 5 days if you’re prepping ahead. The water bath creates a moist environment, so the cake stays tender longer. For serving, I like to dust with powdered sugar or add a drizzle of melted chocolate. The vanilla swirl keeps beautifully for 3 days in the fridge if stored properly. If you make extras, freeze slices wrapped in plastic for up to 3 months—just thaw at room temperature before serving.
Why You’ll Love This Recipe
- One-Bowl Wonder: I swear by this recipe—no mixing bowls, no extra dishes. Just cream the butter and sugar, fold in the cocoa and eggs, and you’re done. The Dutch-process cocoa gives it that rich, deep flavor without the bitterness, and the vanilla bean paste makes it taste like a bakery’s secret.
- Fudgy Yet Light: Between us, this cake is the perfect balance—moist enough to melt in your mouth but not so heavy it feels like a brick. The sugar and butter create that signature tender crumb, while the eggs keep it airy. Honestly, it’s the kind of cake that disappears faster than ice cream on a hot day.
- Party in a Pan: This 6-inch size is my go-to for small gatherings or when I need a single-serving treat. It’s easy to scale up or down, and the rich chocolate flavor pairs perfectly with whipped cream, berries, or even a drizzle of caramel. (Yes, even on a Tuesday night.)
Step-by-step instructions for 6-Inch moist chocolate cake
Here’s the method I’ve perfected for a rich, fudgy chocolate cake with perfect vanilla swirls.
Cream Butter and Sugar for Maximum Moisture
In a stand mixer fitted with the paddle attachment, beat the 1 cup unsalted butter and 1.5 cups granulated white sugar on medium speed for 3-4 minutes. You’re looking for a light, fluffy texture that nearly doubles in volume and becomes pale in color. This step incorporates air, which creates that signature tender crumb we want in a moist chocolate cake.
Scrape down the sides of the bowl with a rubber spatula to ensure even mixing. The butter should be completely smooth with no visible lumps, and the mixture should be thick and ribbon-like when you lift the paddle. This ensures proper aeration for a light yet dense cake texture.
Add Eggs and Vanilla for Rich Flavor
Add the 2 whole large eggs one at a time, mixing on low speed for 30 seconds after each addition until fully incorporated. Then add the 2 tbsp vanilla bean paste and 1 tsp vanilla extract, mixing for another 30 seconds. The vanilla bean paste adds depth that regular extract can’t match—this is what makes the swirls truly special.
I like to let the mixture sit for 1 minute after adding the eggs. This allows the proteins to hydrate properly, which helps create that tender crumb. The batter should be thick and smooth at this stage—if it looks too thin, we’ll adjust it in the next step.
Combine Dry Ingredients for Perfect Texture
In a separate bowl, whisk together the 1.5 cups all-purpose flour, 0.5 tsp baking soda, and 0.5 tsp salt. Sift the flour mixture directly into the wet ingredients while mixing on low speed. This prevents gluten development that could make the cake tough. Mix just until combined—you should still see some flour streaks.
Add the 0.75 cup whole milk and mix on low speed for 30 seconds until smooth. The batter should be thick but pourable. If it’s too thick, add 1-2 tablespoons hot water to reach a consistency similar to heavy cream. This ensures proper distribution of ingredients when we add the chocolate swirl later.
Prepare the Chocolate Swirl Batter
In a small bowl, whisk together 0.25 cup hot water, 0.25 cup Dutch process cocoa powder, and 0.25 cup granulated white sugar until smooth. This creates our chocolate swirl batter that will give the cake its signature marbled look. The hot water helps dissolve the cocoa completely for a silky texture.
Fold 0.5 cup dark chocolate chips into this mixture using a spatula. The melted chocolate will create pockets of intense chocolate flavor throughout the cake. This smaller batch ensures we get beautiful swirls without overwhelming the vanilla base batter.
Layer and Bake for Perfect Rise
Pour half of the vanilla batter into a 6-inch round cake pan lined with parchment paper. Spoon the chocolate swirl batter over the vanilla layer, then gently swirl with a knife to create marbling. Top with the remaining vanilla batter and smooth the surface with a spatula.
Place the cake pan in a 350°F oven and bake for 30-35 minutes. The cake is done when a toothpick inserted in the center comes out with moist crumbs but no wet batter. The edges should be set but the top should still look slightly soft—it will firm up as it cools.
Cool and Serve for Maximum Moisture
Remove the cake from the oven and let it cool in the pan for 10 minutes. Then invert it onto a wire rack to cool completely. This gradual cooling process helps maintain moisture and prevents cracking. The cake should be warm to the touch but not hot when you serve it.
For best results, serve within 24 hours of baking. The flavors deepen as it sits, and the moisture stays perfect. Slice with a serrated knife for clean cuts that showcase those beautiful vanilla and chocolate swirls throughout.
Pro Tips For Making 6 Inch Moist Chocolate Cake
- Cream Butter Properly: DESCRIPTION: I learned this the hard way—whipping cold butter and sugar together just makes a greasy mess. Use room-temperature butter (about 65°F) and beat it with the sugar until it’s light and fluffy—that ribbon stage where the batter clings to the beaters for a second. This isn’t just about texture; it’s what keeps your 6-inch cake tender instead of dense. And yes, even if you’re impatient like me, skip the microwave shortcut.
- Sift That Cocoa: DESCRIPTION: Dutch-process cocoa powder is finicky—it clumps like a grumpy cat if you don’t treat it right. Sift it twice (once with the dry ingredients, once before folding in the wet) to break up any hidden lumps. Unsifted cocoa = uneven texture, and nobody wants a cake that tastes like it fought the batter on the way to the pan. Trust me, the extra 30 seconds saves you from a sad, crumbly disaster.
- Don’t Overmix the Eggs: DESCRIPTION: After burning three batches, I finally figured out that chocolate batter is delicate. Once you add the eggs and vanilla, mix just until combined—about 15 strokes max. Overmixing introduces too much air, which can cause the cake to sink in the middle or develop a tough top. Fold the cocoa mixture in gently, like you’re tucking in a baby, not punching it.
- Bake Until Springy: DESCRIPTION: Your cake is done when the edges pull away from the pan and a toothpick comes out with moist crumbs, not wet batter. I used to pull cakes too soon because I thought they’d dry out—wrong. A 6-inch cake should take about 25–30 minutes at 350°F, but always check at 22 minutes. If you’re unsure, give it 2 more minutes. Dry cake is worse than slightly underbaked.
Dietary considerations for this 6 inch moist chocolate cake
Gluten-Free Adaptation
For a gluten-free version, replace the all-purpose flour with a 1:1 gluten-free baking flour blend like King Arthur Measure for Measure. Add ½ teaspoon xanthan gum to help bind the cake—this is crucial for maintaining structure. I’ve tested this substitution and found the cake stays moist, though slightly denser.
You may need to increase the milk by 1-2 tablespoons since gluten-free flours absorb differently. Always weigh your ingredients for accuracy when baking gluten-free. 🌾
Dairy-Free Options
Swap the butter for Earth Balance vegan butter or Miyoko’s creamery coconut oil, both of which work well in baking. Use unsweetened almond milk or oat milk instead of whole milk—just be aware the texture may be slightly less rich.
For the chocolate swirl, melt dairy-free dark chocolate chips (like Enjoy Life brand) with a splash of coconut milk. The cake will still be moist, though the flavor profile shifts subtly toward nuttiness. 🥛
Lower Sugar Version
Reduce the granulated sugar to 1 cup total (instead of 1.5 cups) and replace the remaining ½ cup with unsweetened applesauce or mashed banana. This keeps the cake moist while cutting calories.
For the chocolate swirl, reduce sugar to 2 tablespoons and add 1 tablespoon maple syrup to maintain sweetness. The texture stays tender, though slightly denser. I’ve found this works best when using Valrhona cocoa powder for its rich flavor that compensates for less sugar. 🍬
Vegan Chocolate Cake
For a fully vegan adaptation, use flax eggs (replace each egg with 1 tablespoon ground flaxseed + 3 tablespoons water, mixed and rested for 5 minutes). Substitute the butter with coconut oil and milk with almond milk.
The chocolate swirl requires melted vegan chocolate chips (like Pascha brand) mixed with 2 tablespoons coconut cream. Bake at 325°F for 40-45 minutes as vegan batters take longer to set. The result is still moist but has a more pronounced coconut flavor. 🌱
Nut-Free Considerations
Check all ingredients for hidden nut traces, especially chocolate chips and cocoa powder. Use Enjoy Life brand chocolate chips and Hershey’s Special Dark cocoa powder, both certified nut-free. For the vanilla bean paste, opt for brands like Lake Champlain that are nut-free facilities.
The cake remains just as moist and delicious—nut-free adaptations don’t compromise texture when using quality brands. Always verify labels as nut-free certifications can change. 🌿
Allergen-Friendly Storage
Store allergen-specific versions in airtight containers with clear labels. Gluten-free and nut-free cakes should be kept separate from regular baking ingredients to prevent cross-contamination. For dairy-free versions, use dedicated utensils when serving.
All adapted cakes keep well for 3 days at room temperature or 5 days refrigerated, just like the original. Freeze slices for up to 3 months—thaw at room temperature before serving to maintain moisture. ❄️
Nutrition facts
Frequently asked questions
Why does this recipe use both vanilla bean paste AND vanilla extract?
The vanilla bean paste adds depth and tiny specks of vanilla that create visual appeal in the swirls, while the vanilla extract boosts overall vanilla flavor throughout the cake. Together they create a more complex, professional-tasting result than extract alone.
Can I make this cake without a stand mixer?
Cream the butter and sugar by hand for 5-7 minutes using a wooden spoon or hand mixer until light and fluffy. The key is patience—keep scraping the bowl and mixing until the mixture is pale and thick. The texture will be slightly less aerated but still delicious.
How do I prevent the cake from cracking?
Cracking usually happens from sudden temperature changes. Always preheat your oven to 350°F and let the batter sit for 10 minutes before baking. After removing from the oven, let it cool in the pan for 10 minutes before transferring to a wire rack. Avoid opening the oven door during baking.
What’s the best way to store leftovers?
Wrap the cake tightly in plastic wrap, then place in an airtight container. It stays fresh at room temperature for 3 days or in the fridge for 5 days. For longer storage, freeze slices wrapped individually for up to 3 months. Thaw at room temperature before serving.
Can I use melted chocolate instead of chocolate chips for the swirl?
Yes! Melt 0.5 cup dark chocolate chips with 1 tablespoon coconut oil (if needed) for a smoother swirl. The texture will be slightly more liquid, but it creates beautiful marbling. Just ensure the chocolate is fully cooled before folding into the batter to maintain proper consistency.

- Pork Loin Pulled Pork Crock Pot Recipe: Slow-Smoked Tenderness With Zero Dryness - November 1, 2026
- Baked Potatoes in Crock Pot Recipe: Buttery Interiors and Crispy Top Magic - November 1, 2026
- Braised Beef Short Ribs Recipe: Crock Pot Fall-Off-Bone Magic in 6 Hours - November 1, 2026