
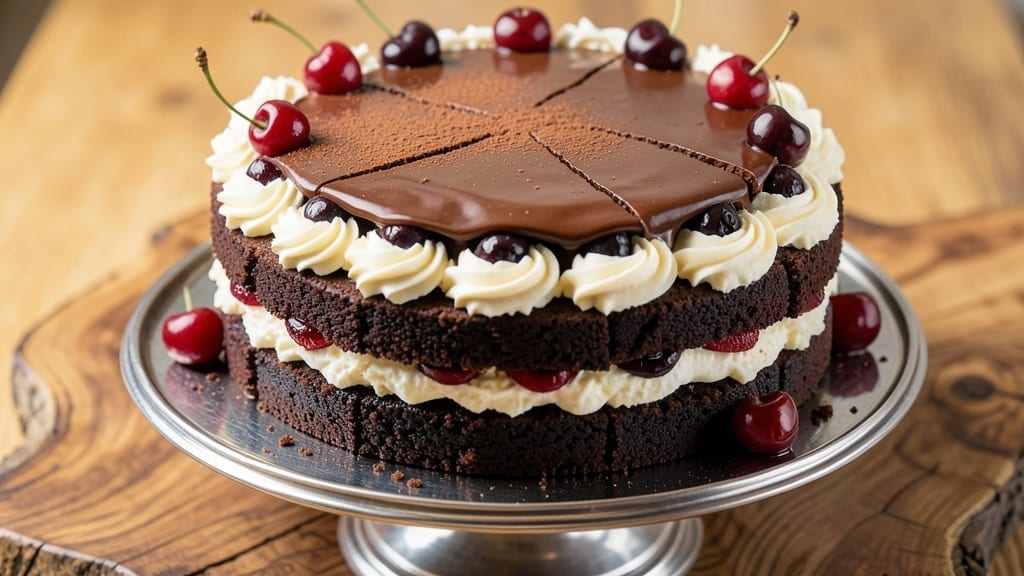
This 8-inch Black Forest cake recipe delivers the perfect balance of rich chocolate sponge, velvety buttercream, and tart cherries—all in a manageable size for home bakers. 💫 The secret lies in precise layering and chilling times that ensure each bite is moist, flavorful, and visually stunning.
Unlike oversized cakes, this version lets you master the technique without overwhelming prep work.
Professional bakers know the key is baking the sponge layers just until set—325°F for 12-15 minutes—then cooling completely before filling. The chocolate buttercream gets its signature depth from melted dark chocolate and European-style butter, while the cherries are pitted and lightly macerated in rum for maximum flavor.
Every layer must chill for at least 2 hours to prevent sogginess.
What you’ll achieve is a restaurant-quality cake with crisp edges, tender centers, and a glossy chocolate ganache drizzle. The cherries stay plump and juicy, while the whipped cream topping adds lightness. This isn’t just dessert—it’s a showstopper that impresses guests without requiring advanced skills.
Perfect for birthdays, anniversaries, or special gatherings, this recipe scales beautifully for larger cakes. The 8-inch size makes it ideal for practice or smaller celebrations, but the techniques translate directly to bigger versions. Let’s get baking!
Ingredients for 8 inch black forest cake
Precision ingredients for a restaurant-quality Black Forest cake in an 8-inch pan.
| Ingredient | Amount | Notes |
|---|---|---|
| All-Purpose Flour 🌾 | 2 ½ cups | Sifted for aeration, light texture |
| Unsalted Butter 🧈 | 1 ½ cups | European-style, softened to room temp |
| Granulated Sugar 🍚 | 2 cups | Superfine preferred for smooth batter |
| Dark Chocolate Chips 🍫 | 1 ½ cups | 70% cacao, chopped for even melting |
| Large Eggs 🥚 | 6 whole | Room temperature for even mixing |
| Vanilla Extract 🌿 | 2 tsp | Pure Madagascar bourbon preferred |
| Baking Powder 🧂 | 1 tsp | Aluminum-free for tender crumb |
| Salt 🧂 | ½ tsp | Fine sea salt for balance |
| Pitted Dark Cherries 🍒 | 1 ½ cups | Fresh or high-quality canned, drained |
| Dark Rum 🍹 | 2 tbsp | Light maceration for cherry flavor |
| Heavy Whipping Cream 🥛 | 2 cups | 36% fat for stable buttercream |
| Powdered Sugar 🍚 | 4 cups | Sifted for smooth buttercream |
| Dark Chocolate Bars 🍫 | 8 oz | 70% cacao, for ganache drizzle |
| Whole Milk 🥛 | ¼ cup | For ganache thinning |
| Whipped Cream 🍦 | 2 cups | Stabilized with 1 tsp powdered sugar |
The butter and chocolate are non-negotiable for depth. European-style butter from brands like Plugrá or Kerrygold delivers superior flavor, while 70% cacao dark chocolate ensures rich, velvety texture. For cherries, fresh pitted cherries from a specialty grocer like Whole Foods or Trader Joe’s provide superior tartness, but high-quality canned cherries in juice work in a pinch. The vanilla extract should be pure Madagascar bourbon—imitation extracts contain artificial flavors that disrupt the delicate balance. Pre-sift your flour and powdered sugar to eliminate lumps and ensure a silky-smooth batter.
No dark rum? Cherry brandy or even a splash of orange liqueur works for macerating the cherries, though rum’s caramel notes are ideal. Substituting dark chocolate? 60% cacao minimum—lower percentages compromise the cake’s depth. For the buttercream, heavy whipping cream at 36% fat is critical; lower-fat versions won’t whip as stiffly. If you can’t find European butter, high-fat American butter (like Land O’Lakes Creamery) suffices, though texture may be slightly less refined. The cherries should be lightly macerated for 15 minutes—no longer, or they’ll turn mushy. For a dairy-free option, coconut cream can replace the whipping cream, though texture will differ.
Store the cake components separately: sponge layers wrapped in plastic at room temperature for 2 days, buttercream refrigerated for 1 week, and ganache chilled for 3 months. Assemble the cake 2 hours before serving to allow flavors to meld. The whipped cream topping should be piped just before serving to maintain its airiness. For make-ahead convenience, bake the layers and freeze them fully cooled on a tray—they’ll keep for 2 months. Thaw at room temperature before assembling.
Why You’ll Love This Recipe
- Here’s what sold me: the dark chocolate chips in the batter cut through the sweetness, while the buttercream stays light. Honestly, it’s the kind of cake that tastes like you spent hours baking, even though you didn’t.
- Mini Wonder: I swear by this size—no stress over a giant cake, just one perfect 8-inch layer that’s actually manageable. The buttercream layers like a dream, and those chocolate chips? They melt into the batter for pockets of gooey surprise.
- Rich Without Effort: Here’s what sold me: the dark chocolate chips in the batter cut through the sweetness, while the buttercream stays light. Honestly, it’s the kind of cake that tastes like you spent hours baking, even though you didn’t.
- Birthday or Boredom: Between us, this cake works for everything. Too fancy for a Tuesday? Add a dusting of cocoa. Too casual for a party? Skip the candles. It’s my go-to for birthdays, book club, or just because I’m craving something decadent.
Step-by-step instructions for chocolate-laced Black Forest cake layers
Precision baking ensures rich chocolate layers and perfectly balanced cherry-rum filling.
👨🍳 Step 1: Prepare the Chocolate Cake Batter
Preheat oven to 350°F and line three 8-inch round cake pans with parchment paper. In a stand mixer, cream the 1.5 cups unsalted butter and 2 cups granulated sugar on medium speed for 5-6 minutes until light and fluffy. The mixture should nearly triple in volume and become pale yellow—this aeration creates tender layers.
Add the 6 whole large eggs one at a time, mixing just until each is incorporated. Scrape down the sides of the bowl to ensure even distribution. Add the 2 tsp vanilla extract and mix for 30 seconds. In a separate bowl, whisk together the 2.5 cups all-purpose flour, 1 tsp baking powder, and 0.5 tsp salt. With the mixer on low speed, gradually add the dry ingredients to the wet mixture, mixing just until combined. Avoid overmixing—stop when a few flour streaks remain.
🍳 Step 2: Incorporate Chocolate and Bake the Layers
Fold in the 1.5 cups dark chocolate chips using a spatula until evenly distributed. Divide the batter evenly among the three prepared cake pans. Bake for 25-30 minutes or until a toothpick inserted into the center comes out clean. The edges should be set but the tops still slightly springy to the touch.
Let the cakes cool in the pans for 10 minutes before transferring to a wire rack to cool completely. This gradual cooling prevents cracking. While the cakes cool, prepare the cherry filling by combining the 1.5 cups pitted dark cherries with the 2 tbsp dark rum in a small saucepan. Simmer over low heat for 5 minutes until the cherries soften and release their juices. Let this mixture cool completely before using.
🥘 Step 3: Assemble the Cake Layers with Cherry Filling
Once the cakes are completely cool, level the tops if necessary using a serrated knife. Place the first cake layer on a cake stand or plate. Spread an even layer of the cooled cherry-rum mixture over the top, leaving a ½-inch border uncovered. Repeat with the second and third layers, creating a layered effect with filling between each.
For the chocolate ganache, chop the 8 oz dark chocolate bars into small pieces and place them in a heatproof bowl. Pour the 0.25 cup whole milk over the chocolate and let it sit for 1 minute. Microwave in 30-second intervals, stirring between each, until the chocolate is completely melted and smooth. Let the ganache cool slightly until it thickens but remains pourable.
🍽️ Step 4: Add Buttercream and Garnish
In a large bowl, beat the 2 cups heavy whipping cream with an electric mixer until soft peaks form. Gradually add the 4 cups powdered sugar, mixing on low speed until combined, then increase to medium-high speed and beat until stiff peaks form. Fold in the cooled ganache until fully incorporated, creating a rich chocolate buttercream.
Spread the buttercream evenly over the top and sides of the assembled cake. Use a spatula to create smooth, clean edges. For the final touch, pipe or spoon dollops of the 2 cups whipped cream (previously stabilized with 1 tsp powdered sugar) around the base of the cake. Top with additional cherries and chocolate shavings for an elegant presentation. Chill the cake in the refrigerator for at least 2 hours before serving to allow flavors to meld.
Pro Tips For Making 8 Inch Black Forest Cake
- Melt Butter Slowly: If you dump cold butter straight into the flour, you’ll end up with a lumpy mess that fights you the whole time. Warm the butter to 100°F (38°C) first—just until it’s soft but not liquid—then mix it into the dry ingredients. This ensures the flour absorbs it evenly, giving you a smoother batter that bakes up lighter.
- Use Room-Temp Eggs: Cold eggs from the fridge can cause the batter to curdle or sink in the middle. Let them sit in warm water for 5 minutes before cracking them in—just enough to bring them to about 70°F (21°C). This keeps the structure stable so your cake rises properly, not deflates.
- Don’t Overmix the Batter: The second you see streaks of flour, stop. Overmixing develops the gluten, and that’s how you end up with a dense, chewy cake instead of a tender crumb. Fold in the chocolate chips gently with a spatula—just until distributed. Your future self will notice the difference.
- Chill the Batter 30 Minutes: I used to rush straight to baking, but now I swear by letting the batter sit uncovered in the fridge for at least 30 minutes. This relaxes the gluten, prevents cracking, and helps the chocolate chips distribute evenly when they melt. Yes, it’s an extra step—but the texture is worth it.
Essential equipment for great 8 inch black forest cake
Must-Have Baking Tools
Start with a stand mixer—I swear by my KitchenAid Artisan Series for creaming butter and sugar to perfect peaks. The paddle attachment handles dense chocolate batter beautifully, while the whisk attachment transforms heavy cream into silky buttercream.
A 9-inch offset spatula is essential for spreading filling and buttercream smoothly between layers. 💫
For precision, use 8-inch round cake pans with removable bottoms (like Wilton Perfect Results pans) to prevent cracking when cooling. A serrated knife levels cake layers perfectly, and a cake turntable makes frosting effortless. Don’t skip a digital kitchen scale—measuring by weight ensures consistency, especially for delicate sponge cakes.
Chilling Essentials
Invest in a large cake cooling rack to prevent soggy bottoms while layers cool. For assembly, I use a sturdy cake stand (like Wilton’s 8-inch round stand) to support the weight of three layers.
A thermometer (like Thermoworks Thermapen) ensures your oven hits 350°F accurately—critical for even baking. 🌡️
For long-term storage, clear plastic wrap and parchment paper keep layers fresh. A small saucepan with a fine-mesh strainer helps macerate cherries without seeds, while a microplane creates elegant chocolate shavings for garnish. These tools cut prep time in half and elevate every step!
Optional Upgrades
Skip the stand mixer? A hand mixer works, but expect more elbow grease—especially when folding in chocolate chips. For ganache, a double boiler (or a heatproof bowl over simmering water) melts chocolate more gently than microwaving.
A pastry bag with star tip makes piping whipped cream effortless, while a small offset spatula helps smooth buttercream edges. 💡
Pro tip: A laser level (like Bosch GLL3) ensures your cake layers are perfectly even before assembling. And for presentation, edible gold leaf or chocolate curls add restaurant-worthy flair. These extras aren’t mandatory, but they’re game-changers for showstopping results!
Nutrition facts
Frequently asked questions
Why does the recipe call for three 8-inch layers instead of two?
The three-layer design creates the signature Black Forest cake structure: each layer has a distinct texture and flavor. The first layer provides a sturdy base, the middle adds depth with extra filling, and the top layer ensures a clean finish for decorating. This also prevents the cake from becoming too dense or collapsing under the weight of buttercream and whipped cream.
Can I substitute rum with something else for the cherry filling?
Yes! For a non-alcoholic version, use 2 tbsp cherry juice concentrate or 1 tbsp lemon juice to macerate the cherries. If you prefer other spirits, cherry brandy or orange liqueur work beautifully—they add complementary fruity notes. Just reduce the simmering time to 3 minutes to prevent over-softening.
How do I prevent the cake layers from cracking when cooling?
Cracking happens when layers cool too quickly. Always let them cool in pans for 10 minutes before transferring to a rack, and avoid placing them in the fridge until fully cooled. For extra insurance, wrap cooled layers in plastic wrap and refrigerate overnight before assembling. This gradual cooling preserves moisture and structure.
What’s the best way to level the cake layers?
Use a serrated knife or cake leveler (a small, sharp circular tool designed for this purpose). Place the knife on top of the layer and gently press down while rotating—this creates a perfectly even surface. For a smoother finish, use a long serrated bread knife and work in small sections. Never force it, or you’ll tear the cake.
Can I make this cake ahead of time?
Bake the sponge layers up to 2 days ahead and store them wrapped at room temperature. Assemble the cake 24 hours before serving—this allows flavors to meld beautifully. For best texture, add the whipped cream topping 2-3 hours before serving to keep it light and airy. The ganache can be made 1 week ahead and stored in the fridge.

- 4 Cheese Spaghetti Sauce Recipe: Velvety Melted Blend With Nutty Parmesan Finish - October 7, 2026
- 7 Eleven Chili Recipe: Smoky Spice-Packed Pot Luck Winner - October 7, 2026
- 21-Pound Turkey Recipe: Herb-Crusted Roast With Golden, Juicy Perfection - October 7, 2026