
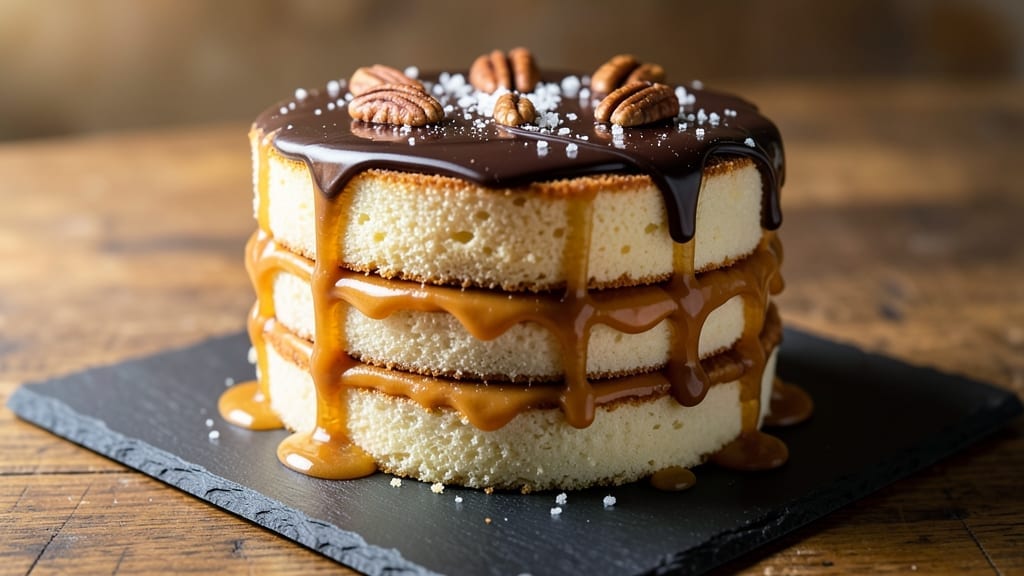
This 3-layer caramel cake recipe delivers the perfect balance of rich vanilla bean swirls, gooey caramel filling, and velvety buttery frosting—every slice is pure indulgence. 💛 The secret lies in precise layering and baking techniques that ensure each component comes together flawlessly, creating a showstopper dessert that tastes as luxurious as it looks.
What sets this recipe apart is the foolproof method for achieving perfectly moist cake layers with just the right tenderness, while the caramel filling stays warm and gooey even after chilling.
The buttery frosting adds that final touch of elegance, creating a cake that’s as impressive to serve as it is to eat. With clear instructions and professional techniques, you’ll achieve restaurant-quality results at home.
By the time you’re done, you’ll have a decadent cake with layers of vanilla bean flavor, pockets of caramel, and a smooth frosting that ties it all together.
The visual appeal is just as important as the taste—each slice reveals the beautiful swirls and layers, making it perfect for celebrations or when you want to treat yourself to something truly special.
Ready in about 3 hours (including cooling time), this recipe is perfect for special occasions or when you want to impress with a dessert that feels like a labor of love. Let’s get started on creating your perfect caramel cake!
Ingredients for 3 layer caramel cake
Twelve essential ingredients for a showstopping cake with layers of vanilla swirls and gooey caramel.
| Ingredient | Amount | Notes |
|---|---|---|
| All-Purpose Flour 🌾 | 4 cups | Sifted for light texture |
| Granulated Sugar 🍚 | 2 ½ cups | Superfine preferred for smoothness |
| Vanilla Bean Paste 🌿 | 2 tbsp | High-quality for authentic flavor |
| Unsalted Butter 🧈 | 2 cups | Room temperature, European preferred |
| Large Eggs 🥚 | 6 whole | Room temperature for even baking |
| Baking Powder 🧂 | 2 tsp | Aluminum-free for best results |
| Salt 🧂 | ½ tsp | Fine sea salt preferred |
| Whole Milk 🥛 | 1 ½ cups | Room temperature for smooth batter |
| Heavy Cream 🥛 | 1 cup | Cold for caramel filling |
| Granulated Sugar 🍚 | 2 cups | For caramel filling |
| Unsalted Butter 🧈 | 1 cup | Cubed for caramel |
| Vanilla Extract 🌿 | 1 tsp | Pure Madagascar preferred |
| Salted Butter 🧈 | 2 cups | For frosting, softened |
| Powdered Sugar 🍚 | 4 cups | Sifted for smooth frosting |
| Heavy Cream 🥛 | ½ cup | Chilled for frosting |
The vanilla bean paste and European-style butter make all the difference here. For the paste, Madagascar Bourbon is the gold standard—it’s what professional bakers use for that authentic depth. If you’re buying butter, Plugrá or Président (the kind with higher fat content) will give you that velvety texture. The cake layers need to be perfectly moist, so don’t skimp on the whole milk—it’s what keeps them tender. I always grab my ingredients from Whole Foods or a specialty baking store, but the regular supermarket stuff works if you’re in a pinch. Just make sure your butter isn’t watery and your vanilla isn’t synthetic.
No vanilla bean paste? Pure vanilla extract plus a pinch of sugar is a decent swap, but you’ll miss that complex flavor. For the caramel filling, if you can’t find heavy cream, half-and-half works in a bind**—just know it won’t be as rich. The frosting is where you can get creative: cream cheese frosting is a popular variation, but stick with butter for that classic, luxurious feel. If your powdered sugar clumps, sift it through a fine-mesh strainer—no one likes lumpy frosting. And for the love of cake, don’t use salted butter in the cake layers—it’ll throw off the balance.
This cake is all about patience. The layers need to cool completely before assembling, or you’ll end up with a soggy mess. Store any leftovers in an airtight container at room temperature for up to 3 days, or freeze the fully assembled cake for up to 2 months. I always make a double batch—one for the party, one for the freezer. The caramel filling can be made a day ahead and kept in the fridge, but bring it to room temperature before using. And if you’re serving it warm? Torch the top with a kitchen torch for that restaurant-worthy finish.
Why You’ll Love This Recipe
- No-Fuss Layers: I swear by this recipe because it’s actually foolproof—just mix, bake, and repeat. The three layers stay perfectly moist without needing a fancy scale or tricky techniques. Honestly, even if you’re not a baker, the buttercream and caramel filling do most of the work.
- Caramel Magic: That gooey, buttery caramel swirled between layers? It’s the star. The vanilla bean paste in the cake layers adds this warm, floral depth that makes every bite feel like a hug—especially when the caramel oozes out with the first forkful.
- Party Ready: Between us, this cake is my secret weapon for birthdays, holidays, or just because. The layers hold up beautifully for slicing, and the rich flavor means no one will guess it’s not from a bakery. (Yes, even on a Tuesday night.)
- Budget-Friendly Luxury: Here’s what sold me—the ingredients are simple but ridiculously satisfying. Butter and sugar make the cake layers tender, while the caramel filling feels indulgent without breaking the bank. Plus, leftovers? They’re even better the next day.
Step-by-step instructions for decadent vanilla bean swirls and buttery frosting layers
Here’s how to build this showstopper layer by layer—each component deserves attention!
👨🍳 Step 1: Bake the Vanilla Bean Cake Layers
Preheat your oven to 350°F and grease three 8-inch round pans with nonstick spray, then line the bottoms with parchment paper. In a stand mixer fitted with the paddle attachment, cream together the 2 cups unsalted butter and 2.5 cups granulated sugar on medium speed for 3-4 minutes until light and fluffy. This step is crucial—you’re incorporating air that will make those layers tender and airy.
Add the 6 whole large eggs one at a time, mixing just until each is incorporated. Then whisk in the 2 tbsp vanilla bean paste, 1.5 cups whole milk, 2 tsp baking powder, and 0.5 tsp salt. Sift in the 4 cups all-purpose flour and mix on low speed just until combined—don’t overmix or your layers will be tough. Divide the batter evenly among the prepared pans.
🔥 Step 2: Create the Salted Caramel Filling
While the cake bakes, make the caramel filling. In a heavy-bottomed saucepan, melt the 1 cup unsalted butter over medium heat. Add the 2 cups granulated sugar and stir constantly until dissolved and golden brown—about 5-7 minutes. This is your signal to carefully pour in the 1 cup cold heavy cream all at once, stirring vigorously as it bubbles up.
Return to heat and simmer for 3-4 minutes until thickened slightly. Remove from heat and stir in the 1 tsp vanilla extract. Let cool to room temperature before assembling the cake—this prevents melting your frosting. The caramel should be smooth and glossy, with a rich amber color that promises decadence in every bite.
🥘 Step 3: Assemble the Cake Layers with Caramel Swirls
Bake the cake layers for 25-30 minutes or until a toothpick inserted comes out clean. Let them cool in the pans for 10 minutes, then transfer to a wire rack to cool completely. Level the tops if needed with a serrated knife. Here’s where the magic happens: spread a thin layer of caramel filling over the first layer, then place the second layer on top. Repeat with the third layer.
For the swirls, pipe or spoon dollops of caramel around the edges of each layer, then gently swirl with a knife to create marbled patterns. This technique creates those stunning visual swirls while keeping the cake moist. Chill the assembled cake in the refrigerator for 30 minutes to set the caramel before frosting.
🍳 Step 4: Make the Buttery Vanilla Frosting
Beat the 2 cups salted butter and 4 cups powdered sugar together until light and fluffy. Add the 0.5 cup chilled heavy cream and mix until smooth. This frosting should be thick enough to hold its shape but still pipeable—if it’s too stiff, add 1 tsp milk at a time until perfect. The butter should be softened but not melted, ensuring a stable frosting that won’t slide off your cake.
Spread the frosting over the chilled cake, creating a smooth base. Use a spatula to create clean edges, then decorate with additional caramel drizzles or chocolate shavings if desired. The contrast between the creamy frosting and rich caramel will make your cake look like it belongs in a patisserie window.
Pro Tips For Making 3 Layer Caramel Cake
- Chill the Butter First: Take your unsalted butter straight from the fridge and cut it into cubes—no need to soften at room temperature. This keeps the cake layers tender and prevents them from drying out when baked, which is especially important for a 3-layer cake where texture matters most.
- Whisk Eggs Like a Pro: Separate your eggs, then whisk the yolks and whites separately until the whites hold stiff peaks. Fold them into the batter last—over-mixing after adding the whites will make the cake dense. I learned this the hard way when my first attempt turned into a brick.
- Skip the Overmixing: Once you add the flour to the wet ingredients, mix just until combined—about 20 seconds. Overmixing develops gluten, which makes the cake tough. This recipe relies on a delicate crumb, so resist the urge to “get it all in there.”
- Bake Layers Low and Slow: Set your oven to 325°F (not 350°F) and bake the layers until a toothpick comes out clean—not crumbly. A slower bake ensures even cooking without burning the edges, which is crucial for a 3-layer cake where every layer needs to be perfectly set.
Serving suggestions for leftovers
Presentation Plating
Serve this cake on a slate board or gold-rimmed cake stand to elevate its visual appeal. I love using a clear acrylic stand for a modern look—it lets the caramel swirls shine while keeping the cake elevated.
For a rustic touch, try a wooden cake board with a white linen cloth underneath. Always slice with a hot knife (dip in hot water and wipe dry) for clean, professional cuts that prevent crumbs. 💫
Garnish Ideas
Drizzle warm caramel sauce in zigzag patterns over the frosting for a glossy finish. Add toasted coconut flakes or crushed pretzels for texture contrast. For a pop of color, sprinkle edible gold leaf or white chocolate shavings along the edges.
I also like adding fresh raspberries or blackberries for a fruity balance that cuts through the richness.
Serving Style
For a classic dessert platter, arrange slices on a three-tiered stand with alternating layers of cake and fruit. Use mini cake stands for individual servings at parties. When presenting, always include a small bowl of extra caramel sauce on the side—guests will love dipping their slices.
For a warm serving, torch the top of each slice with a kitchen torch just before presenting. 🔥
Occasion Pairings
This cake shines at birthday celebrations or holiday dinners—its elegant layers make it feel special. For a wedding dessert table, add a lace doily underneath for a vintage touch. At Summer picnics, serve it chilled with sparkling lemonade or chilled rosé to balance the richness.
For a cozy winter gathering, pair it with spiced coffee or hot chocolate for a comforting contrast.
Make-Ahead Tips
Assemble the cake 1 day ahead and store it in an airtight container at room temperature. The flavors meld beautifully overnight. For longer storage, freeze the fully frosted cake (without garnishes) for up to 2 months.
Thaw in the fridge overnight, then bring to room temperature before serving. Reheat slices briefly in the microwave (10 seconds) to soften the caramel if desired. ⏰
Nutrition facts
Frequently asked questions
Can I make this cake without a stand mixer?
Use a hand mixer or even whisk by hand in a large bowl. For the butter and sugar mixture, beat for about 5-7 minutes until light and fluffy—just keep at it! The key is patience; you’re building air into the batter, so don’t rush this step. For the frosting, a hand mixer works perfectly too.
Why did my cake layers sink in the middle?
This usually happens from overmixing the batter or opening the oven too soon. Always check for doneness with a toothpick—it should come out clean after 25-30 minutes. Let the layers cool completely in the pans for 10 minutes before transferring to a rack. Also, make sure your oven is properly calibrated.
How do I get the caramel filling to be extra gooey?
For ultra-gooey caramel, use heavy cream instead of half-and-half and simmer it just until it thickens slightly—about 3-4 minutes. Let it cool completely before assembling, then chill the cake for 30 minutes before frosting. The cold frosting will help set the caramel while keeping it rich and spreadable.
Can I substitute vanilla bean paste with regular vanilla extract?
Yes, but you’ll lose some depth of flavor. Use 2 teaspoons of pure vanilla extract plus 1/4 teaspoon of sugar to mimic the vanilla bean’s complexity. For best results, use Madagascar Bourbon vanilla extract. The paste contains both seeds and extract, giving that authentic vanilla bean aroma.
How do I store leftovers without drying out the cake?
Wrap each slice tightly in plastic wrap or store the whole cake in an airtight container with parchment paper between layers. Keep at room temperature for 3 days or freeze for 2 months. To revive, let it sit at room temperature for 30 minutes before serving—this helps restore moisture.

- 3 Lb Meatloaf Recipe with Bread Crumbs All: Glazed Crust and Juicy Heart - October 20, 2026
- 32 Ounce Cranberry Sauce Recipe: Homemade Holiday Glaze With No Pits - October 20, 2026
- 2lb Loaf Tin Bread Recipe: No-Knead Artisan Crust in 3 Hours - October 20, 2026