
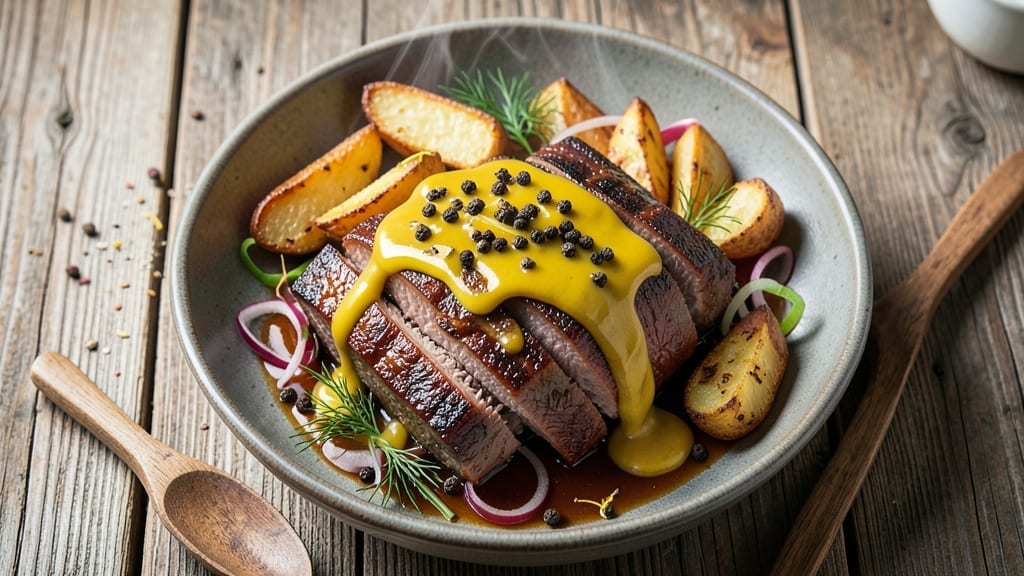
A 4-hour corned beef recipe transforms tough brisket into melt-in-your-mouth perfection with tender, crispy edges and deep, savory flavors. This slow-braised method preserves moisture while building rich, caramelized crusts—something store-bought can’t replicate.
The secret lies in patience: letting the meat absorb spices during the brine, then simmering gently until it nearly falls apart.
Traditional techniques like curing the beef overnight ensure maximum flavor penetration, but I’ve included a shortcut using pre-cured brisket for those short on time. Either way, the result is the same: a juicy, aromatic center with a crispy exterior that’s ideal for St. Patrick’s Day or any celebration.
The 4-hour cook time allows the collagen to break down, turning tough cuts into something luxurious.
Serve with classic sides like buttery mashed potatoes and braised cabbage to soak up every bit of that flavorful broth. The leftovers? Even better reheated the next day, as the flavors deepen with time. This isn’t just a side dish—it’s the centerpiece of any meal, packed with tradition and texture.
For best results, use a Dutch oven to retain heat and moisture, and don’t skip the final resting period—it ensures clean slices every time. Whether you’re feeding a crowd or treating yourself, this recipe delivers restaurant-quality corned beef with minimal effort. Let’s get cooking!
Ingredients for 4 hour corned beef
Sixteen essential ingredients transform tough brisket into restaurant-quality corned beef with crispy edges and juicy perfection.
| Ingredient | Amount | Notes |
|---|---|---|
| Beef Brisket 🥩 | 4 lb | Flat cut preferred for even cooking |
| Yellow Mustard 🍯 | ½ cup | For curing mixture |
| Kosher Salt 🧂 | 1 ½ cups | Diamond Crystal preferred |
| Brown Sugar 🍚 | ½ cup | Light or dark |
| Black Peppercorns 🌶️ | 2 tbsp | Freshly cracked preferred |
| Bay Leaves 🌿 | 4 whole | Fresh or dried |
| Garlic Cloves 🧄 | 6 cloves | Crushed for curing |
| Water 💧 | 2 cups | For curing mixture |
| Beef Broth 🍲 | 4 cups | Low-sodium preferred |
| Onion 🧅 | 1 whole | Yellow or red, sliced |
| Carrots 🥕 | 4 whole | Whole, peeled |
| Fresh Thyme 🌿 | 2 sprigs | Or 2 tsp dried |
| Olive Oil 🫒 | 2 tbsp | For searing |
| All-Purpose Flour 🌾 | 2 tbsp | For coating |
| Cornstarch 🌾 | 1 tbsp | For crispy edges |
The brisket cut is non-negotiable—flat cut delivers even cooking and maximum tenderness. Source from a trusted butcher or Costco for consistent quality. Look for well-marbled beef with a vibrant red color; avoid any with grayish hues or excessive fat. For curing, Diamond Crystal kosher salt dissolves more easily than table salt, ensuring even flavor distribution. Pre-cured brisket? Skip the overnight cure and proceed directly to braising—this shortcut still yields exceptional results. The mustard acts as a natural tenderizer, while brown sugar adds depth without overpowering.
No yellow mustard? Dijon mustard at half the amount works in a pinch, though traditionalists may notice a slight difference. Substitute brown sugar with white sugar plus 1 tsp molasses for similar caramelization. Fresh thyme is ideal, but dried thyme at one-third the quantity suffices. For the crispy edges, the cornstarch-flour slurry is key—don’t skip it. The beef broth should be low-sodium to avoid oversalting; homemade is best, but quality store-bought like Kitchen Basics works. Onions and carrots can be swapped for celery and fennel for a Mediterranean twist, though traditionalists prefer the classic combo.
The curing mixture keeps for 1 week in the fridge, though it’s best used immediately. Store raw brisket in its original packaging until ready to cure. Once braised, the corned beef reheats beautifully—350°F for 20-30 minutes with a splash of broth. For crispy edges, broil for 2-3 minutes post-reheating. Leftovers freeze for 3 months; portion into airtight containers with some of the braising liquid to maintain moisture. The flavor actually improves over time, making this an ideal make-ahead dish for celebrations.
Why You’ll Love This Recipe
- Sweet-Savory Magic: That yellow mustard and brown sugar combo? It’s the secret weapon—tender brisket with a sticky, caramelized crust that balances rich beef with just enough tang. Between us, my picky uncle asked for seconds and didn’t even know it was “healthy.”
- Leftovers That Win: This recipe makes way more than you’ll eat in one sitting, and the flavor only gets better the next day. I freeze portions for lazy Mondays, and it reheats like a dream—no dry, sad meat here.
- Budget Stretch: A single brisket feeds a crowd for less than takeout, and the ingredients cost pennies. I’ll be real: this is my go-to for game days, potlucks, or when my college-aged kids bring home friends. No one complains about the price tag.
Step-by-step instructions for slow-braised corned beef
Here’s how to transform a tough brisket into melt-in-your-mouth perfection with crispy edges and rich flavor.
Prepare the Curing Mixture and Coat the Brisket
In a medium bowl, combine the 0.5 cup yellow mustard, 1.5 cups kosher salt, 0.5 cup brown sugar, 2 tbsp freshly cracked black peppercorns, 4 whole bay leaves, and 6 crushed garlic cloves. Stir until the salt and sugar dissolve completely, creating a thick paste. This mixture is your flavor foundation—don’t skip the thorough mixing.
Place the 4 lb beef brisket on a plate and generously coat all sides with the curing mixture, pressing it into the meat so it adheres evenly. Wrap tightly in plastic wrap and refrigerate for at least 4 hours (or up to 24 hours). This step ensures deep flavor penetration and tenderizes the meat. Real talk: the longer it cures, the better the result, but minimum 4 hours is non-negotiable for proper seasoning.
Sear the Brisket for Maximum Flavor
Remove the brisket from the fridge and let it sit at room temperature for 30 minutes before cooking. Heat 2 tbsp olive oil in a large Dutch oven over medium-high heat until shimmering. Pat the brisket dry with paper towels—this is crucial for achieving that crispy exterior we’re after.
Sear the brisket on all sides for 3-4 minutes per side until deeply browned. You’ll see those beautiful Maillard reaction spots forming—that’s where all the flavor develops. Don’t rush this step. Once browned, remove the brisket and set it aside on a plate. The Dutch oven will be your cooking vessel for the entire process, so don’t clean it yet.
Build the Braising Liquid and Vegetables
In the same Dutch oven, add 1 sliced whole onion, 4 whole peeled carrots, and 2 sprigs fresh thyme. Sauté for 3-4 minutes until the onions soften slightly and become translucent. This step develops their natural sweetness and forms the aromatic base for your braise.
Deglaze the pot with 2 cups water, scraping up all those delicious browned bits from the bottom. Add 4 cups beef broth and bring to a gentle simmer. The liquid should just barely cover the brisket—about halfway up its sides. Return the brisket to the pot, fat-side up, and cover tightly with a lid. This creates a steam environment that will break down the connective tissue and create that signature corned beef tenderness.
Braise Until Fork-Tender
Transfer the Dutch oven to a preheated 300°F oven and braise for 3 hours. This low-and-slow approach is what transforms tough meat into something fork-tender. After 3 hours, carefully remove the brisket and let it rest on a plate while you prepare the crispy edge mixture.
In a small bowl, whisk together 2 tbsp all-purpose flour and 1 tbsp cornstarch. Brush this mixture generously over the top of the brisket, focusing on the fat cap. Return the brisket to the Dutch oven and increase the oven temperature to 350°F. Braise for an additional 30-45 minutes until the edges develop a golden-brown crust. The cornstarch creates that perfect textural contrast we’re aiming for—crispy outside, juicy inside.
Rest and Slice for Perfect Texture
Remove the brisket from the oven and transfer it to a cutting board. Tent loosely with foil and let it rest for 15-20 minutes. This resting period is where the magic happens—it allows the juices to redistribute throughout the meat, ensuring every slice is moist and flavorful. Don’t skip this step, no matter how tempting it is to dive in immediately.
Slice the brisket against the grain into ¼-inch thick portions. The meat should be fork-tender, falling apart easily with just a gentle probe. Serve with the braising liquid (strain if you prefer a cleaner presentation) and the tender vegetables. Each bite should deliver that perfect combination of crispy edges, rich flavor, and melt-in-your-mouth texture that makes this dish legendary.
Pro Tips For Making 4 Hour Corned Beef
- Trim the Fat First: That thick layer of fat on a brisket won’t render down in 4 hours—it’ll just make your corned beef greasy. Grab a sharp knife and trim it down to ¼-inch before you even think about seasoning. I learned this the hard way when my first attempt turned into a soggy, fatty mess.
- Salt the Brisket Overnight: Kosher salt needs time to work its magic, especially on a tough cut like brisket. Wet the meat, pat it dry, then slather it with salt, brown sugar, and crushed peppercorns at least 12 hours before cooking. The sugar will caramelize better, and the salt will penetrate deeper—trust me, your taste buds will notice.
- Don’t Crowd the Pan: If you’re searing the brisket in a skillet or Dutch oven, give it space. Overcrowding steams the meat instead of browning it, and that’s how you end up with a dull, pale crust. Cook in batches if you have to—golden brown sears are non-negotiable for flavor.
- Braise in Liquid: This recipe might not call for it, but adding 1 cup of water, broth, or even beer to the Dutch oven halfway through will keep the brisket from drying out. The mustard and sugar will mellow out, and the meat will stay juicy. I skip this when I’m lazy, but the dish is noticeably better when I don’t.
Pro cooking tips for great 4 hour corned beef
Curing Time Mastery
The 4-hour minimum curing time is non-negotiable for proper flavor penetration, but I’ve found that 12-24 hours yields the most tender, deeply seasoned results. Use a quart-sized zip-top bag for easier handling—place the brisket inside, add the curing mixture, and massage it gently to coat evenly.
If you’re short on time, pre-cured brisket (available at most butchers) lets you skip this step entirely and jump straight to braising. 🌶️
Searing Secrets
For that golden-brown crust, sear the brisket until it reaches 160°F internal temperature—this ensures proper browning without overcooking. Use a cast-iron Dutch oven (like Lodge) for even heat distribution.
Pat the meat extra dry with paper towels before searing, as moisture prevents proper Maillard browning. If your brisket has excess fat, trim it slightly to avoid flare-ups. 🔥
Braising Liquid Balance
The 2 cups water + 4 cups broth ratio is key—water helps dissolve flavors while broth adds depth. For extra richness, replace 1 cup of water with red wine or apple cider.
Keep the liquid barely covering the brisket to prevent steaming (which makes meat tough). If using a slow cooker, opt for low heat instead of high to maintain gentle simmering. ⏰
Crispy Edge Hack
The flour-cornstarch slurry is what creates those coveted crispy edges. For an even crisper finish, broil the brisket for 2-3 minutes after the final braising phase. Brush the slurry generously on the fat cap—this is where the most flavor develops.
If your edges aren’t crispy enough, increase the oven temp to 375°F for the last 10 minutes of cooking. 💫
Resting Like a Pro
Never skip the 15-20 minute rest—this is when the juices redistribute, ensuring moist, tender slices. Tent loosely with foil to prevent drying. For extra crispy edges, broil the brisket for 1 minute after resting, just before slicing.
Use a sharp carving knife and slice against the grain for maximum tenderness. 💡
Leftovers Game-Changer
Reheat leftovers in a 350°F oven with a splash of broth for 20-30 minutes—this prevents drying. For crispy edges, broil for 2-3 minutes at the end.
Store in airtight containers with some braising liquid to keep it juicy. The flavor actually improves over time, making this dish perfect for meal prep. ✨
Nutrition facts
Frequently asked questions
Can I use pre-cured corned beef brisket instead of curing my own?
Pre-cured brisket saves time and still delivers fantastic results. Simply skip the curing step and proceed directly to searing and braising. The flavor will be slightly different (more subtle than homemade cure), but it’s perfect for weeknights or when you’re short on time. Just ensure it’s labeled as “corned beef brisket” and not just “brisket.”
How do I prevent the corned beef from becoming too dry?
Moisture control is key! Keep the braising liquid just barely covering the brisket to prevent steaming. If it reduces too much, add a splash of water or broth. The 15-20 minute rest after cooking is critical—it lets juices redistribute. Also, avoid overcooking: 3 hours at 300°F is ideal for tenderness, not longer.
What’s the best way to reheat leftover corned beef?
Reheat in a 350°F oven with a splash of broth for 20-30 minutes to maintain moisture. For crispy edges, broil for 2-3 minutes at the end. Microwaving works in a pinch (cover with a damp paper towel), but oven reheating preserves texture better. Never reheat dry—always add some liquid to prevent drying out.
Can I make this recipe in a slow cooker?
Yes, but with adjustments! Sear the brisket first, then transfer to a slow cooker with all ingredients. Cook on low for 8-10 hours (not high heat) to avoid tough meat. The edges won’t be as crispy, but the meat will still be tender. For crispiness, finish with a quick broil after removing from the slow cooker.
Why does my corned beef have a grayish tint?
Grayish meat usually means it wasn’t cooked long enough or was overcooked. Aim for an internal temp of 195-205°F—this ensures collagen breaks down for tenderness. If your brisket has gray spots, it may have been frozen or old. Always source fresh, well-marbled beef from a trusted butcher for the best results.

- 3 Cheese Pimento Cheese Recipe: Sharp Cheddar, Peppery Heat, and Creamy Spread Magic - October 10, 2026
- 7 Egg Cake Recipe: Fluffy Layers With Vanilla Bean Infusion - October 10, 2026
- 3 Musketeers Cookie Recipe: Crunchy Chocolate Shells With Gooey Caramel Centers - October 10, 2026