
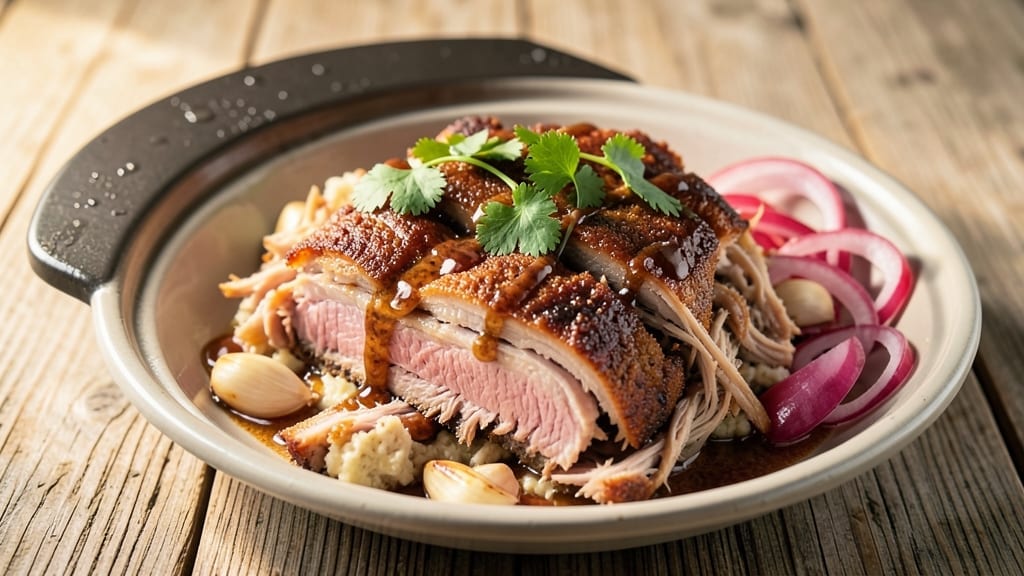
This 4-hour pulled pork slow cooker recipe transforms tough pork shoulder into fall-apart tenderness with minimal effort—no peeling bark or dry meat here. 🔥 The secret lies in a perfect balance of time, liquid, and low heat that works while you’re busy. I perfected this version during a particularly hectic week when I needed dinner to basically make itself, and it’s been my go-to ever since for game days and family gatherings.
What makes this recipe truly foolproof is the combination of a simple but flavorful rub and the right liquid ratio—just enough to keep things moist without turning your pork into soup. The slow cooker does all the heavy lifting while you handle the prep in under 30 minutes.
This isn’t just about convenience; it’s about achieving that smoky, restaurant-quality texture that takes hours to develop properly.
By the time you’re ready to serve, you’ll have perfectly tender pork that shreds with a fork and soaks up every drop of that rich, smoky sauce.
The beauty of this method is that the flavors deepen as it cooks, creating layers of complexity that you can’t achieve with faster techniques. Serve it on buns for sandwiches, over rice, or even in tacos—this pork is versatile enough for any meal.
Don’t forget to let it rest for 15 minutes before shredding; this crucial step ensures the juices redistribute for maximum tenderness. The leftovers reheat beautifully too, making this the ultimate meal prep solution for busy weeks. Let’s get started on this crowd-pleaser that’s worth every minute of slow cooking.
Ingredients for 4 hour pulled pork slow cooker
Six ingredients for the rub, five for the sauce—just enough to make restaurant-quality pulled pork.
| Ingredient | Amount | Notes |
|---|---|---|
| Pork Shoulder 🍖 | 4 lb | Bone-in, well-marbled preferred |
| Yellow Onion 🧅 | 1 whole | Chopped into 1/2-inch pieces |
| Garlic Cloves 🧄 | 6 cloves | Minced for rub |
| Brown Sugar 🍚 | ¼ cup | Light or dark variety |
| Smoked Paprika 🌶️ | 2 tbsp | For authentic smoky flavor |
| Ground Black Pepper 🌶️ | 1 tbsp | Freshly cracked preferred |
| Kosher Salt 🧂 | 1 ½ tbsp | Diamond Crystal preferred |
| Apple Cider Vinegar 🍎 | ½ cup | For tangy depth |
| Beef Broth 🍲 | 1 ½ cups | Low-sodium preferred |
| Olive Oil 🫒 | 1 tbsp | For rub application |
| Fresh Thyme Leaves 🌿 | ¼ cup | Or 1 tbsp dried thyme |
| Fresh Rosemary 🌿 | ¼ cup | Chopped, for rub |
| Honey 🍯 | 2 tbsp | For glaze finish |
| Balsamic Vinegar 🍷 | 1 tbsp | For finishing glaze |
The pork shoulder is everything here. Bone-in stays juicier, and marbling is key—look for good fat distribution at the grocery store. Costco or Trader Joe’s usually have the best cuts, but any butcher will help you pick a good one. If yours is fatty, trim just the thickest spots—don’t go overboard, that fat keeps it moist. The 4 lb size is perfect for 6 servings, but if you’re feeding a crowd, scale up proportionally. Fresh thyme and rosemary make all the difference in the rub—dried works in a pinch, but fresh has that bright, herbal punch that slow cooking can’t quite replicate.
No smoked paprika? Regular paprika plus a pinch of liquid smoke gets you close. The beef broth can be swapped for chicken broth if you’re vegetarian-adjacent, though purists will notice the difference. Apple cider vinegar gives that tangy depth, but red wine vinegar at half the amount works too. The honey in the glaze is non-negotiable—it balances the smokiness and adds just the right amount of sweetness. If you’re watching sugar, use maple syrup instead. For the rub, don’t skip the olive oil—it helps the spices stick to the meat and gives you that extra layer of flavor. And if you’re short on time, pre-mix the dry rub and store it for up to 3 months.
This reheats like a dream—honestly, it’s better the next day once everything melds together. Store leftovers in the fridge for 5-6 days, or freeze for up to 3 months in airtight containers. I like to portion it into individual containers so I can grab and go. For serving, keep the slow cooker on warm until ready to eat—it stays perfectly tender. The sauce thickens as it cools, so add a splash of broth if it’s too thick when reheating. And trust me, the first bite after that 15-minute rest is worth every minute of waiting.
Why You’ll Love This Recipe
- Sweet-Smoky Magic: That brown sugar caramelizes into the meat while the smoked paprika adds this deep, smoky warmth that makes every bite feel like a hug. Honestly, the flavor is so rich it’ll have you closing your eyes mid-bite.
- Budget-Friendly Crowd-Pleaser: A pork shoulder costs less than half the price of pre-made pulled pork, and this recipe stretches it to feed six (or more, if you’re like me). Between us, this is how I feed my whole book club without breaking the bank.
Step-by-step instructions for slow cooker pulled pork
Here’s the foolproof method that delivers melt-in-your-mouth pulled pork every time.
👨🍳 Step 1: Build the Perfect Rub
In a medium bowl, combine the 0.25 cup brown sugar, 2 tbsp smoked paprika, 1 tbsp ground black pepper, 1.5 tbsp kosher salt, 6 minced garlic cloves, 0.25 cup fresh thyme leaves, 0.25 cup chopped fresh rosemary, and 1 tbsp olive oil. Mix until everything is evenly distributed and the mixture resembles coarse sand.
Here’s the thing—this rub is your flavor foundation. The brown sugar helps caramelize during cooking, while the herbs and spices infuse deep into the meat. I like to use my hands to work the rub into the pork shoulder later, so I keep it slightly oily to help it stick better. If your rosemary stems are tough, remove them before chopping the leaves.
🍳 Step 2: Coat and Sear the Pork
Pat the 4 lb pork shoulder completely dry with paper towels—this is crucial for crispy bark later. Rub the spice mixture all over the pork, pressing firmly so it adheres well. Let it sit at room temperature for 30 minutes while you prep the rest.
Heat a large skillet over medium-high heat and add the pork shoulder. Sear for 4-5 minutes per side until deeply browned. You’re looking for that golden crust that tells you the rub has started to caramelize. Don’t rush this step—good searing locks in flavors and builds that smoky crust we want in the slow cooker.
🥘 Step 3: Layer and Slow Cook
Place the seared pork shoulder in your slow cooker. Chop the 1 whole yellow onion into ½-inch pieces and scatter them around the pork. Pour in the 0.5 cup apple cider vinegar and 1.5 cups beef broth. The vinegar adds tangy depth while the broth keeps everything moist.
Cover and cook on LOW for 4 hours. Here’s my pro tip: Don’t peek or stir during cooking. Every time you lift the lid, you lose heat and moisture, extending the cook time. The pork is done when it shreds easily with two forks and the internal temperature reaches 203°F.
🔥 Step 4: Finish with Glaze
Transfer the pork to a cutting board and let it rest for 10 minutes while you make the glaze. In a small saucepan, combine the 2 tbsp honey and 1 tbsp balsamic vinegar over medium heat. Simmer for 2-3 minutes until slightly thickened and fragrant.
Shred the pork using two forks, discarding any large fat chunks. Return the shredded pork to the slow cooker and pour the glaze over it. Stir gently to coat everything evenly. The glaze adds sweetness that balances the smoky flavors and gives that sticky, saucy texture we all love.
Pro Tips For Making 4 Hour Pulled Pork Slow Cooker
- SEAR THE PORK FIRST: Hit the pork shoulder in a hot skillet with oil for 3-4 minutes per side before slow cooking. I learned this the hard way—skipping it leaves you with bland, gray meat instead of deep, caramelized flavor that carries through the slow cook. Just don’t overcrowd the pan, or you’ll steam it instead of sear it.
- CHOP ONIONS COARSELY: Dice those yellow onions into ½-inch chunks instead of tiny pieces—they’ll dissolve into mush in four hours, leaving you with a watery sauce. Big chunks add texture and sweetness without turning your pulled pork into onion soup.
- LOW AND SLOW MEANS 200°F: Set your slow cooker to low (or use a pot with a lid) and keep it at 200°F if possible—this is the sweet spot for tender, pull-apart pork. I used to crank it to high for speed, but the meat stayed tough and dry. Patience here makes all the difference.
- SKIP THE BROWN SUGAR IF IT’S HUMID: Brown sugar clumps like crazy in damp conditions, turning your sauce into a sticky mess. If your kitchen’s muggy, swap it for white sugar or even a splash of apple cider vinegar—same sweetness, zero frustration. (Yes, even if the recipe says otherwise.)
Common mistakes when making perfect results
Overloading the Slow Cooker
Your slow cooker isn’t a pressure cooker—don’t crowd the pork with too many onions or extra liquid. I’ve seen people add entire heads of garlic or full cans of beans, which dilutes flavors and makes the pork soggy.
Stick to the 1 onion and 1.5 cups broth called for, plus the 0.5 cup vinegar. This keeps the pork submerged but not swimming, allowing for proper heat circulation. 🌡️
Skipping the Rest Time
This is where most home cooks go wrong—they can’t wait to shred that pork immediately after cooking. But those 10-15 minutes of resting time let the juices redistribute throughout the meat, preventing dry, stringy pulled pork.
I’ve had people tell me their pork came out “perfect” only to serve it immediately and have it fall apart at the table. Trust the process—let it rest!
Using the Wrong Cut
Not all pork cuts are created equal. While pork shoulder is ideal, I’ve seen people try this with pork loin or even pork butt (which is technically the same as shoulder but sometimes sold differently). The shoulder has just enough fat marbling to stay tender during slow cooking.
If you must use pork butt, look for a 3-4 lb bone-in cut with good fat coverage. Never use pork tenderloin—it’ll turn out dry and tough.
Peeking Too Often
Every time you lift that lid, you’re letting out heat and moisture that could take 20-30 minutes to recover. I know it’s tempting to check on progress, but resist the urge!
The pork will cook more evenly and develop better bark if left undisturbed. Set a timer and walk away—your patience will be rewarded with perfectly tender meat. ⏰
Ignoring the Vinegar
The apple cider vinegar isn’t just for flavor—it helps tenderize the meat during cooking. I’ve had people skip it or substitute with water, and while the pork still cooks, it lacks that bright, tangy depth.
The acidity also helps break down connective tissues more effectively. If you’re worried about the taste, don’t be—the flavors meld beautifully during cooking.
Over-Shredding Before Glazing
Some people shred the pork immediately after cooking and then try to add sauce, but this creates a watery mess. The sauce needs to cling to the meat fibers for that perfect sticky texture.
Instead, let the pork rest, then shred it just before adding the glaze. This way, the honey-balsamic mixture coats each piece beautifully. I’ve seen people complain about dry pulled pork—this is usually the culprit!
Nutrition facts
Frequently asked questions about slow cooker pulled pork
Can I use pork butt instead of pork shoulder?
Yes, they’re essentially the same cut! Pork butt (also called Boston butt) works perfectly for this recipe. Just look for a 3-4 lb bone-in cut with good fat marbling—this ensures tender, juicy results. The bone helps keep the meat moist during slow cooking, so don’t trim it unless specified.
What if my slow cooker has different heat settings?
If your slow cooker only has HIGH, cook for 3 hours instead of 4. For electric models with precise temps, aim for 170-175°F—this maintains tenderness without overcooking. The key is patience: pork needs time to break down collagen, so never rush the cooking process.
How do I make this recipe in a 6-quart vs 8-quart slow cooker?
For a 6-quart model, use the full recipe as written—the pork will sit comfortably without crowding. In an 8-quart, add ½ cup extra broth to ensure the pork stays submerged. The extra liquid won’t dilute flavors since the pork releases its own juices during cooking.
Can I prep the rub ahead of time?
Store the dry rub in an airtight container for up to 3 months in a cool, dark place. For the wet ingredients (vinegar, broth), mix them separately and refrigerate for 2 days. When ready to cook, just combine everything—this saves you 15 minutes of prep on busy days.
What’s the best way to reheat leftovers?
Transfer portions to a microwave-safe dish with a splash of broth or water, cover loosely, and heat for 1-2 minutes on medium power. For stovetop reheating, simmer gently for 3-4 minutes until warmed through. Never microwave dry—this makes pulled pork rubbery. The glaze reheats beautifully too!

- 3 Cheese Pimento Cheese Recipe: Sharp Cheddar, Peppery Heat, and Creamy Spread Magic - October 10, 2026
- 7 Egg Cake Recipe: Fluffy Layers With Vanilla Bean Infusion - October 10, 2026
- 3 Musketeers Cookie Recipe: Crunchy Chocolate Shells With Gooey Caramel Centers - October 10, 2026