
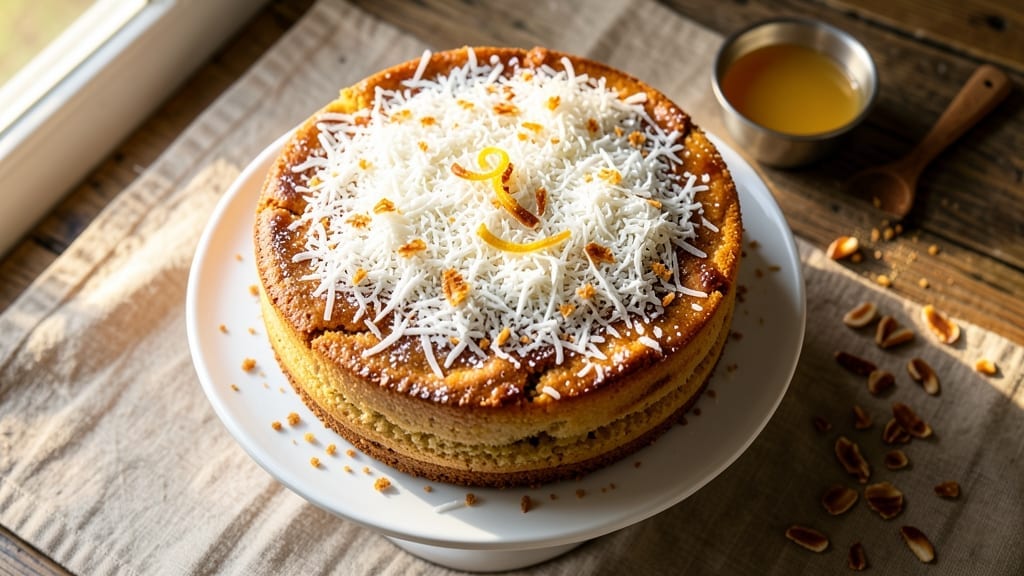
A 6-inch coconut cake brings tropical vacation vibes to your kitchen with its moist layers and velvety frosting. This recipe delivers perfectly balanced sweetness and texture—no dry crumbs or overly rich frosting here.
The secret lies in properly hydrating the cake batter and letting it cool before frosting for clean, professional layers.
What makes this recipe stand out is the creamy coconut frosting—light enough to complement the cake without overpowering its natural flavor. We use a simple buttercream base infused with coconut extract and toasted coconut flakes for texture.
The result? A dessert that looks elegant enough for a dinner party but simple enough for a weeknight treat.
By the time you’re done, you’ll have a beautifully layered cake with tender crumb and smooth frosting. The frosting’s subtle coconut aroma enhances the cake’s flavor, creating a cohesive tropical experience. Serve with fresh berries or a sprinkle of toasted coconut for extra flair.
This recipe scales perfectly for gift boxes or small gatherings, and the frosting can be made ahead. Let’s get baking!
Ingredients for 6 inch coconut cake
Tropical flavors meet tender layers in this 6-inch coconut cake with velvety coconut frosting.
| Ingredient | Amount | Notes |
|---|---|---|
| All-Purpose Flour 🌾 | 1 ½ cups | Sifted for light texture |
| Granulated Sugar 🍚 | 1 cup | White or light brown |
| Unsalted Butter 🧈 | ¾ cup | Cold, cubed for creaming |
| Large Eggs 🥚 | 2 whole | Room temperature preferred |
| Unsweetened Shredded Coconut 🥥 | ½ cup | Toasted for enhanced flavor |
| Coconut Extract 🌴 | 1 tsp | Pure, not imitation |
| Baking Powder 🧂 | 2 tsp | Aluminum-free preferred |
| Salt 🧂 | ½ tsp | Fine sea salt |
| Whole Milk 🥛 | ½ cup | Room temperature |
| Vanilla Extract 🌿 | 1 tsp | Pure vanilla preferred |
| Powdered Sugar 🍚 | 3 cups | For frosting, sifted |
| Unsalted Butter 🧈 | 1 cup | Cold, cubed for frosting |
| Heavy Whipping Cream 🥛 | 1 cup | Cold for whipping |
| Toasted Coconut Flakes 🥥 | ¼ cup | For garnish and texture |
The unsweetened shredded coconut is key—Trader Joe’s or Bob’s Red Mill brands stay fresh longer and have better texture. Toast it yourself in a dry pan for 3-4 minutes until golden and fragrant (that nutty aroma is everything). For the coconut extract, avoid imitation—Goya or McCormick make reliable pure versions. The butter should be cold when creaming to avoid dense cake layers. If you’re short on time, room-temperature butter works, but expect slightly heavier texture. Diamond Crystal baking powder is my go-to for reliable rise, but check expiration dates—old baking powder won’t leaven properly.
No coconut extract? Vanilla extract at double the amount works in a pinch, though the flavor won’t be identical. Short on shredded coconut? Toasted unsweetened coconut flakes (same quantity) give a similar texture. For the frosting, powdered sugar brands like Domino work fine, but sift it—lumps make for uneven frosting. The heavy whipping cream is non-negotiable for that light, airy texture—store-brand works just as well as name brands. If you’re making this ahead, prep the frosting first—it keeps perfectly in the fridge for up to 5 days while you bake the cake. The vanilla extract can be swapped for vanilla bean paste if you’re feeling fancy, but pure extract is more accessible.
Store the frosting in an airtight container between layers—it’ll keep for up to 3 days in the fridge. The cake layers stay moist for 2 days at room temperature if wrapped tightly in plastic, but frosted cakes are best refrigerated for 3-4 days. For gift boxes, assemble the cake and frost it just before wrapping—this keeps everything fresh. The toasted coconut flakes can be stored in the freezer for up to 3 months in a sealed container. If you’re making this for a party, assemble the cake 4 hours ahead—the flavors meld beautifully overnight, and it’s one less thing to worry about on the day.
Why You’ll Love This Recipe
- No Mixer Needed: I swear by this—just fold in the shredded coconut by hand. The cake turns out tender and moist without overworking the batter, and honestly? My stand mixer gets a break.
- Tropical Twist: That first bite of coconut flakes? It’s like a little vacation in your mouth. The sugar caramelizes just enough to give it a subtle crunch, while the butter keeps it rich without being heavy.
- Party in a Pan: Six inches is the perfect size for a single serving or a crowd—slice it into wedges for a brunch spread, or serve whole at a picnic. (Yes, even on a Tuesday night.)
- Budget-Friendly Luxury: Butter and eggs make it feel special, but the shredded coconut stretches the flavor without breaking the bank. Plus, leftovers? They disappear faster than I can say “second slice.”
Step-by-step instructions for tropical coconut layers
Here’s how to build perfectly moist layers and silky coconut frosting for a showstopping cake.
Prepare the Cake Batter
Preheat your oven to 350°F and grease two 3-inch round cake pans, then line their bottoms with parchment paper. In a medium bowl, whisk together the 1.5 cups all-purpose flour, 2 teaspoons baking powder, and ½ teaspoon salt. Sift this dry mixture directly into a large mixing bowl to aerate the flour.
Add the 1 cup granulated sugar, 2 whole eggs, 1 teaspoon vanilla extract, and 1 teaspoon coconut extract to the dry ingredients. Using an electric mixer on medium speed, beat for 2 minutes until the mixture is light and airy. This step incorporates air that will help create that signature tender crumb.
Cream the Butter and Add Wet Ingredients
Reduce the mixer speed to low and gradually add the ¾ cup cold cubed butter, mixing just until combined. The butter should be fully incorporated but still maintain some small lumps for texture. Add the ½ cup whole milk and mix for another 30 seconds until smooth.
Fold in the ½ cup unsweetened shredded coconut using a spatula, being careful not to overmix. Divide the batter evenly between the prepared cake pans, filling each about two-thirds full. Bake for 25-30 minutes or until a toothpick inserted in the center comes out clean. The cakes should be golden on top but still slightly springy to the touch.
Prepare the Creamy Coconut Frosting
While the cakes cool, make the frosting by beating the 1 cup cold cubed butter with an electric mixer until light and fluffy, about 3-4 minutes. Gradually add the 3 cups powdered sugar and mix on low speed until combined. Increase the speed to medium and beat for another 2 minutes until smooth.
In a separate bowl, whip the 1 cup cold heavy whipping cream until soft peaks form. Gently fold the whipped cream into the butter-sugar mixture until fully incorporated. This creates a light, airy frosting that won’t be too heavy on the cake layers. Taste and adjust sweetness if needed by adding more powdered sugar.
Assemble and Frost the Cake
Let the baked cakes cool completely in their pans for 10 minutes, then transfer to a wire rack to cool completely. Once cooled, level the tops if needed and place one cake layer on a serving plate. Spread a generous layer of the coconut frosting on top, then place the second cake layer on top.
Spread the remaining frosting evenly over the top and sides of the cake, creating a smooth finish. Press the ¼ cup toasted coconut flakes gently onto the sides of the cake for texture and visual appeal. Chill the cake in the refrigerator for 30 minutes before serving to allow the frosting to set slightly and the flavors to meld together.
Pro Tips For Making 6 Inch Coconut Cake
- Preheat Pan First: Pop your 6-inch cake pan in the oven at 350°F (175°C) for 5 minutes before pouring the batter—this guarantees the edges won’t stick, even with coconut’s natural moisture. I learned this the hard way after prying apart a stubborn cake that refused to release cleanly.
- Toast the Coconut: Lightly toast the shredded coconut in a dry skillet over medium heat for 3–4 minutes until fragrant and just golden—this deepens its flavor and prevents a soggy texture in your cake. Skip this, and you’ll end up with a dessert that tastes more like wet cardboard than tropical dessert.
- Whip Butter and Sugar: Cream the butter and sugar together until the mixture is pale yellow and ribbony—about 3–5 minutes with a stand mixer—before adding eggs. This ensures a lighter, airier crumb, not a dense one. I was skeptical until I tried it; the difference is noticeable.
- Don’t Overmix Wet Ingredients: Once you fold in the flour and coconut, stop mixing as soon as everything is just combined—overmixing develops gluten and makes the cake tough. Use a spatula to gently fold, and resist the urge to stir like you’re making pancakes. Your future self will thank you.
Essential equipment for perfect results
Must-Have Mixing Tools
Start with a stand mixer like the KitchenAid Artisan Series—it handles both cake batter and frosting effortlessly. For hand mixers, the Cuisinart Power Advantage is my go-to for its powerful motor and comfortable grip.
A spatula set (I love OXO Good Grips) is essential for folding in shredded coconut without overmixing. Don’t skip a microplane for zesting citrus or grating fresh coconut if you’re adding extra texture. 🥥
Precision Measuring
Accurate measurements make all the difference in baking. Invest in a digital kitchen scale (like the OXO Good Grips) for dry ingredients—it’s more precise than measuring cups. For wet ingredients, a liquid measuring cup with clear markings (I use Pyrex) ensures you don’t overfill.
A fine-mesh sieve (such as Norpro) is a game-changer for sifting flour and powdered sugar to avoid lumps in the frosting.
Baking Essentials
Two 3-inch round cake pans with removable bottoms (I prefer Wilton Non-Stick) make layering and cooling easier. Line them with parchment paper circles to prevent sticking. A toothpick is non-negotiable for checking doneness—insert it into the center of the cake to confirm it comes out clean.
For even baking, use an oven thermometer (like Thermoworks) to ensure your oven isn’t running hot or cold.
Frosting Finishing
For smooth frosting, a bench scraper (I use OXO Good Grips) helps spread frosting evenly between layers. A small offset spatula (like Ateco) is perfect for decorating the sides of the cake.
To add texture, toast coconut flakes in a dry pan over medium heat for 3-4 minutes until golden—this enhances their flavor and adds a beautiful crunch. 🌴
Cooling and Storage
Let cakes cool completely on a wire rack (I recommend SimpleHouseware) to prevent sogginess. For storage, use airtight containers (like Rubbermaid) to keep layers fresh. If gifting, a clear cellophane wrap (such as Ball Mason) keeps the cake looking fresh while allowing the coconut aroma to shine.
For transport, a cake carrier (like Wilton) ensures stability and protects the frosting.
Nutrition facts
Frequently asked questions
Can I use a different-sized pan for this 6-inch coconut cake?
Yes, but adjust baking times accordingly. For a 2-inch pan, bake for 15-20 minutes—these cakes are thinner and cook faster. For a 4-inch pan, increase time to 30-35 minutes. Always check with a toothpick! The key is to keep the batter depth consistent (about two-thirds full).
How do I make this coconut cake gluten-free?
Swap the all-purpose flour for a 1:1 gluten-free baking flour blend (like Bob’s Red Mill) and add ½ teaspoon xanthan gum to improve texture. Reduce milk by 2 tablespoons since GF flours absorb differently. The frosting stays the same—just ensure your powdered sugar is gluten-free certified.
Why did my coconut cake turn out dense instead of tender?
Overmixing the batter or using warm butter are the most common culprits. Always cream cold butter until light and fluffy (about 2-3 minutes), then mix just until combined. Fold in coconut gently with a spatula. Also check your baking powder—old leavener won’t create proper lift. For extra moisture, brush layers with simple syrup before frosting.
Can I make this cake ahead of time?
Bake the layers 1 day ahead and store wrapped at room temperature. Frost the cake 4 hours before serving—this lets flavors meld beautifully. The frosting can be made 3 days ahead and refrigerated. For gift-giving, assemble completely 2 days ahead and transport in a cake carrier to keep it stable.
What’s the best way to decorate this cake?
Start with a smooth frosting base using a bench scraper. For texture, press toasted coconut flakes onto the sides while frosting is still soft. Add fresh berries (like strawberries or raspberries) for color contrast. For a tropical touch, pipe coconut cream swirls on top using a star tip. Keep decorations simple—the cake’s natural coconut flavor should shine!
